In last week’s blog post, we discussed how to create and test POST requests. This week, we will tackle testing PUT requests. A PUT request is actually very similar to a POST request; the major difference is that POST requests are intended to create a new record, and PUT requests are intended to replace an existing record.
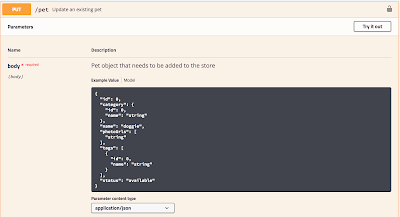
Let’s return to the Swagger Pet Store to learn how to create a PUT request. Click on the PUT /pet request to open it:
As you can see, the endpoint and the body of the request are exactly the same as that of the POST request. The only difference is the http verb used: PUT instead of POST. To see how the PUT request works, let’s first do a POST with these values:
{
“id”: 1,
“category”: {
“id”: 1,
“name”: “Cat”
},
“name”: “Grumpy Cat”,
“photoUrls”: [
“https://pbs.twimg.com/profile_images/948294484596375552/RyGNqDEM_400x400.jpg”
],
“tags”: [
{
“id”: 1,
“name”: “Mixed breed”
}
],
“status”: “available”
}
Then do a GET to make sure that the pet was added correctly. Now, let’s do a PUT with these values:
{
“id”: 1,
“category”: {
“id”: 2,
“name”: “Dog”
},
“name”: “Droopy Dog”,
“photoUrls”: [
“https://upload.wikimedia.org/wikipedia/en/thumb/f/fd/Droopy_dog.png/150px-Droopy_dog.png”
],
“tags”: [
{
“id”: 2,
“name”: “Beagle”
}
],
“status”: “pending”
}
Notice that all of the values in the body of the request have been changed except for the pet id. After you have submitted the request, do a GET to confirm that all of the values have been replaced.
A PUT request will always replace ALL of the values in the entire record, which means that if any of the values are missing, they will be removed. For example, if we did a PUT request on that same pet id, and only included a name and a photo URL, that will be all that will be saved. Any tag or status that was present in the record before will now be gone.
To talk about testing PUT requests, I’m going to move away from the Swagger Pet Store and use a different example. Let’s consider an application that stores a list of employees. The application writes to a table that has these values:
The PUT request that will be used to update a record in the table will look like this:
{
“firstName”: “Amy”,
“lastName”: “Miller”
}
And the URL of the request will look like this: app/employee/1. In this application, the employee id is passed in through the URL, rather than the body of the request, which is a common practice.
The first thing we will test in our imaginary application is the Happy Path: if we send this request, does employee 1 now have the name Amy Miller instead of Fred Smith? You could check this by querying the database directly, and by doing a GET request.
Next, we’ll see what happens when trying to do a PUT request on a record that doesn’t exist. Imagine doing the same request, but instead of using the URL app/employee/1, we’ll use app/employee/3. As you can see in the data table, there is no record 3. So this request should return an error, such as a 404 Not Found response. You can also try passing in ids that make no sense, such as letters, words, or symbols, and passing in no id at all. All these requests should return an appropriate error message.
Now let’s turn to the body of our request. Let’s imagine that both the firstName and the lastName are required for the PUT request. We should get an appropriate error message if we send in an empty body, or just the firstName, or just the lastName. In a scenario where there are many more fields than we have here, you’ll want to test lots of different combinations where required and non-required fields are missing.
As I mentioned above, a PUT request should replace ALL the values in a record; it’s like the record was completely removed and replaced with a brand new one. So if we consider for a moment a scenario where the firstName is NOT required, and record 1 is currently Amy Miller, and we do a test where we send in only a lastName of “Brown”, record 1 should now have a NULL value for the firstName, and Brown should be the lastName.
You could also see what happens when you try to pass in a request with fields that aren’t in the table at all! In this example, you could try sending in
{
“firstName”: “Amy”,
“middleName”: “Jo”
“lastName”: “Miller”
}
and verify that the field is either ignored or an appropriate message is returned.
Now we can go on to the individual fields themselves. What sort of values are allowed? What are the character limits? You’ll want to test each individual field to make sure that you receive an appropriate error message when the limits are violated, and that you receive an appropriate error message when you try to pass in characters or values that are not allowed. You’ll also want to try sending in values that could be used for cross-site scripting or SQL injection; these should either be rejected outright or sanitized in such a way that a malicious attack would not work.
Finally, you can return to the http verb and the general request. What happens if you change the PUT request to a POST request? In our hypothetical application, a POST request with a URL of app/employee/1 will return a 409 error, because record 1 already exists. You can also see what happens if you remove or change required headers on the request.
Hopefully this post has given you a clear indication of how PUT requests behave, and the best ways to test them. Next week, we’ll be on to the lesser-used PATCH request!

