Last week I introduced the concept of RESTful API requests, and discussed why it’s crucial that we test them in our applications. This week, we will begin our discussion of RESTful request types with the GET request. This is usually the easiest request to test, because all we are doing is retrieving data from the database. We don’t need to worry about whether we are manipulating data correctly; we just need to retrieve it and check that we get a correct response.
In my opinion, the two best tools to learn about REST requests are Swagger and Postman. Swagger is an open-source framework that allows developers to create documentation for RESTful APIs. If your API has a Swagger file, it’s easy to see what kinds of requests your API allows, and what sorts of parameters those requests are expecting. The developers of Swagger have also created a sample application that you can use to practice making REST requests: petstore.swagger.io. This website simulates an online pet store, where users can enter and retrieve information about their pets.
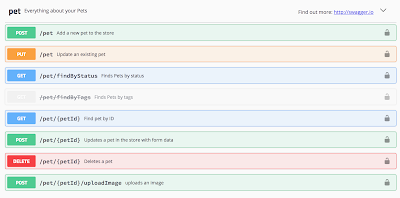
When you go to the petstore.swagger.io website, you can see that there are a variety of requests available for the pet endpoint. Let’s take a look at the GET /pet/{petId} endpoint. Click on that request, then click on the “Try it out” button. You will notice that a petId is a required parameter. Enter “1” into the parameter text field, and click the “Execute” button. Scroll down to the Response Body section, and you will see that a pet has been returned! Scroll up a bit and take a look at the Request URL: http://petstore.swagger.io/v2/pet/1. We will use this URL to learn about making requests in Postman.
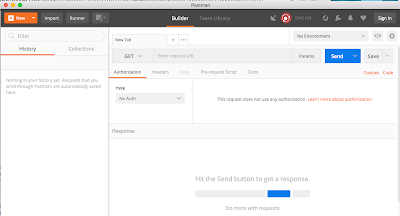
Postman is the best tool that I have found for testing REST requests. It is available for free at https://www.getpostman.com, and there is also a paid Team version. If you don’t have it already, download Postman and start it up.
Postman should start up with an open tab, set to use a GET request. All you have to do now is enter the request URL that we used before, and click the “Send” button. You should get the same response that you did when you made the request in Swagger.
Now that we understand how GET requests work, let’s think about how to test them! We have obviously tested a Happy Path scenario where we are getting a pet with an id of 1. What happens if we change the id parameter to 2? What happens if we change the id parameter to -1? What if it’s 0? What if it’s “foo”? I should mention here that because the Swagger Pet Store is a test application, you may see results or behavior that would not be wanted in an application. For instance, when I tested with a parameter of -1, I got a result. It’s a fairly common expectation that the ids of data objects not be negative numbers, so this would be a bug in a real application.
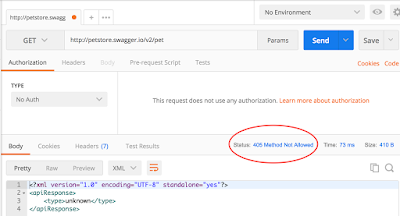
Let’s find out what happens when we don’t enter any parameter at all, so our request URL is just http://petstore.swagger.io/v2/pet. We get an xml response that says “unknown”. You may also notice that the status code returned is “405 Method Not Allowed”.
The status codes you get after you make a REST request tell you a bit about the behavior of your application. We’ll discuss status codes further in a later post, but for now, let’s note that a status code of 200 is good, and a status code that begins with 4 generally indicates that something has gone wrong. You may get a 404 status when you search for a pet id that doesn’t exist. This means that the record was not found.
Let’s return now to the Swagger Pet Store and take a look at another GET request. This time, we will look at the pets/findByStatus request. Click on the request, and then click the “Try it out” button.
The question mark in the URL indicates that we are using a query parameter. This is a little different from the path parameter we saw when we were doing a GET by pet id. Query parameters always begin with a question mark, and then have the parameter name, an equals sign, and the value of the parameter we want to use.
Let’s copy this request and run it in Postman. Simply use the + button near the top of the screen to open a tab and create a new request. It should be a GET request by default. Enter the URL and click “Send”. You should get the same result that you saw when you ran the request in Swagger.
We have now tested one Happy Path for this request. You can also run the request using the “available” parameter and the “pending” parameter. You could run this request: http://petstore.swagger.io/v2/pet/findByStatus?status=pending,sold and get all of the pending pets and all of the sold pets! What happens if you send a value of “foo” for the status parameter? You will get an empty set [ ] as a result. This is different from what we saw when we sent in “foo” as the parameter for the GET pet by pet ID request. This demonstrates the difference between a path parameter and a query parameter. When a path parameter does not exist, you will generally get a 400-level response code. When a query parameter does not exist, you will generally get a 200 response code and an empty set in the response body.
Now that you have tried out two different GET requests, you can test further by manipulating the request URL in any number of ways. For example, you could see what happens if you make the request an https request instead of http. You could find out what happens if you change the “io” in the request to “com”. You could change the “v2” to “v1”. You could remove the “/pet” endpoint. You could try changing the GET request type to a POST or a DELETE type. Seeing what happens when you manipulate the URL and the request type will give you a sense of how REST requests work, and will also give you ideas for what you could test in an API that you are responsible for.
I hope that this post has demonstrated just how easy API testing is, and also how versatile it can be. With API testing, you can test many scenarios that would not be possible to test through the UI. This is a valuable strategy to use in finding potential design and security flaws earlier in development. Next week, we’ll move on to POST requests!


Thank you for reading them! 🙂
Thank you for all your knowledgeable posts. 🙂