Why You Should Be Testing in Production

This is a true story; I’m keeping the details vague to protect those involved.  Once there was a software team that was implementing new functionality.  They tested the new functionality in their QA environment, and it worked just fine.  So they scheduled a deployment: first to the Staging environment, then to Production.  They didn’t have any automated tests for the new feature, because it was tricky to automate.  And they didn’t bother to do any manual tests in Staging or Production, reasoning that if it worked in the QA environment, it must work everywhere.

You can probably guess what happened next- they started getting calls from customers that the new feature didn’t work.  They investigated and found that this was true.  Then they tried out the feature in the Staging environment and found that it didn’t work there either.  As it turned out, the team had used hard-coded configuration strings that were only valid in the QA environment.  If they had simply done ONE test in the Staging or Production environment, they would have noticed that something was wrong.  Instead, it was left to the customers to notice the problem.

There are two main reasons why things that work in a QA environment don’t work in a Production environment:

1) Configuration problems- This is what happened with the team described above.  Software is complicated, and there are often multiple servers and databases that need to talk to each other in order for the software to work properly.  Keeping software secure means that each part of the application needs to be protected by passwords or other configuration strings.  If any one of those strings is incorrect, the software won’t work completely.

2) Deployment problems- In this age of microservices, deploying software usually means deploying several different APIs.  In a large organization, there may be different teams responsible for different APIs.  For example, when a new feature in API A needs the new code in API B to work properly, API B will need to be deployed first.  It’s possible that Team B will forget to deploy API B or not even realize that it needs to be deployed.  In cases like this, Team A might assume that API B had been deployed, and they will go ahead and deploy API A.  Without testing, Team A will have no way of knowing that the new feature isn’t working.

By running tests in every environment, you can quickly discover if you have configuration or deployment problems.  It’s often not necessary to go through extensive testing of a new feature in Production if you’ve already tested it in QA, but it is vital that you do at least SOME testing to verify that it’s working!  We never want to have our customers find problems before we do.

Confused? Simplify!

As testers, we are often asked to test complex systems.  Gone are the days when testers were simply asked to fill out form fields and hit the Submit button; now we are testing data stores, cloud servers, messaging services, and much more.  When so many building blocks are used in our software, it can become easy to get overwhelmed and confused.  When this happens, it’s best to simplify what we are testing until our situation becomes clear.

Here’s an example that happened recently on my team: we were testing that push notifications of a specific type were working on an iPhone.  One of my teammates was triggering a push notification, but it wasn’t appearing on the phone.  What could be wrong?  Maybe notifications were completely broken.  Maybe they were broken on the iPhone.  Maybe only this specific notification was broken.  Maybe only notifications of this type were broken.  In a situation where there are a lot of notifications to test and we are working on a deadline, this can become very confusing. 

So, we simplified by asking a series of questions and running a test for each one.  We started with:
Is this push notification working on an Android phone?
We triggered the same notification to go to an Android phone, and the push was delivered.  So we ruled out that the notification itself was broken.

Next, we asked:
Is this push notification working on any other iPhone?
We triggered the same notification to go to a different iPhone, and the push was delivered.  So we ruled out that the notification was broken on iOS devices.

Then we asked:
Is ANY notification working on this specific iPhone? 
We triggered some different notifications to go to the iPhone, and no pushes were delivered.  So we concluded that the problem was not with the notification, or with the push service; the problem was with the phone.

In taking a step back and asking three simple questions, we were able to quickly diagnose the problem.  Let’s take a look at another example, using my hypothetical feature called the Superball Sorter, which sorts small and large colored balls among four children, as described in this post.

Let’s imagine that we are testing a scenario where we are sorting the balls by both size and color.  We have the children set up with the following rules:
Amy gets only large balls
Bob gets only small purple balls and large red balls
Carol gets only small balls
Doug gets only green balls

When we run the sorter, a small purple ball is next in the sorting process, and it’s Bob’s turn to get a ball.  We are expecting that Bob is going to get the small purple ball because his sorting rules allow it, but he doesn’t get the ball- it goes to Carol instead.  What could be wrong here?  Maybe Bob isn’t getting any balls.  Maybe the purple ball isn’t being sorted at all.  Maybe only the small balls aren’t being sorted.  How can we figure out what is going on?

Our first question will be:
Can Bob get ANY sorted balls?  
We’ll set up the sorter so Amy, Carol, and Doug only get large balls, and Bob only gets small balls.  We run the sorter, and Bob gets all the small balls.  So we know this isn’t the problem.

Can anyone get the small purple ball?
Next, we’ll set up the sorter so that Amy will only get small purple balls, and Bob, Carol, and Doug can get any ball at all.  We’ll set up our list of balls so that the small purple ball is first on the list.  When we start our sorting process with Amy, she gets the small purple ball.  So now we know that the small purple ball isn’t the problem.

Can Bob get the small purple ball in some other scenario?
We saw in our initial test that Bob wasn’t getting the small purple ball, but can he EVER get that ball?  We’ll set up our rules so that Amy will only get large balls, and Bob will get only small purple balls.  We won’t give Carol and Doug any rules. Then we’ll set up our list of balls so that the small purple ball is first on the list.  Amy won’t get the small purple ball, because she only gets large balls, so the small purple ball is offered to Bob.  He gets the ball, so now we know that Bob can get the small purple ball in some scenarios.

At this point, we know that the problem is not the small purple ball.  What is different between the original scenario and the one we just ran?  One difference is that in the original scenario, all four children had a rule.  So let’s ask this question:

Can Bob get the small purple ball when it’s his only rule, and the other children all have rules?
We’ll set up the rules like this:
Amy gets only large balls
Bob gets only small purple balls
Carol gets only small balls
Doug gets only green balls
We again set up our list of balls so that the small purple ball is first on the list.  The ball skips Amy, because it doesn’t meet her rule, and Bob gets the ball.  So now we know that the problem is not that all the children have rules.  So now the next logical question is:

What happens when Bob has TWO rules?
We’ll set up the rules like this:
Amy gets only large balls
Bob gets only small purple balls and small yellow balls
Carol gets only small balls
Doug gets only green balls

Our list of balls is the same, where the small purple ball is first.  This time, the ball skips Amy AND Bob, and Carol gets the small purple ball.

AHA!  Now we have a good working theory: when Bob has two rules, the sorting is not working correctly.  We can test out this theory by giving another child two rules, while giving everyone else one rule.  Are the balls sorted correctly?  What about when a child has two rules that specify color only and not size?  Will the two rules work then?  By continuing to ask questions, we can pinpoint precisely what the bug is.

By making your tests as simple as possible, you are able to narrow down the possibilities of where the bug is.  And by proceeding methodically and logically, you will be able to find that bug as quickly as possible, even in a very complex system.  

Toggles, Revisited

A few years ago, I wrote a blog post detailing why I thought toggles were a bad idea.  It made a clever analogy between toggles and the tribbles on Star Trek’s U.S.S. Enterprise.  I think it’s a fun read, so you may want to check it out; but since the time I wrote it, my opinion has changed a bit. In this post I will explain why I think toggles may be helpful, and I’ll propose some rules for their use.

About a year ago, my team was working on a new notification service that would send out emails and messages more efficiently than the current service.  When the new service was ready, we migrated one notification type to the new service to see how it would work.  We tested the notification extensively and we were sure that we had accounted for all scenarios, so we took the new service to Production.

A couple of weeks later, we discovered that there was an odd case that we hadn’t tested.  If two users in the same company had the same id, the wrong user was getting the notification.  We had no idea that it was possible for two users in the same company to have the same id, so we hadn’t thought to test this.

Fortunately, our new service was behind a toggle.  Since we certainly didn’t want the wrong people to get notifications, we quickly toggled off the new service.  There was no impact to any other customers, because they were still getting their notifications; they were just being notified through the old service.  We were able to quickly fix the bug, get the fix into Production, and toggle the service back on.

If we hadn’t had the toggle, the users with the same id would have continued to get the wrong notifications until we were able to fix the bug.  We would have had to rush to get a code patch into Production, and it’s possible that we would have made mistakes along the way.  Because we had the toggle, we could take the time to make sure that the fix was good, and we could do all the regression testing we wanted.

So, I’ve changed my mind about toggles.  I think they can be useful in situations where there’s a significant risk that accompanies a change.  But if you are going to use toggles, please observe the following rules:

1. Toggles are NOT a substitute for high-quality testing.  Being able to toggle something off at the first sign of trouble does not mean that you can skip testing your new feature thoroughly.  Ideally you should have tested so well that you never need to turn your toggle off.

2. Make sure to test your feature with the toggle on AND with the toggle off.  You don’t want to discover in the middle of dealing with a problem in Production that the toggle doesn’t actually work!

3. When the feature has gone to Production and a certain amount of time has passed, remove the toggle so that the feature is on permanently.  Otherwise you could get into a situation where months from now someone inadvertently toggles the feature off.  And the fewer toggles you have in your application, the fewer combinations of toggles you need to test.

As with many things in software development, the best strategies are those that ensure the best possible outcome for our end users.  When they are used wisely, toggles can help mitigate any unexpected issues found in Production.

What I Learned at POST/CON Part II: Assertions and Scripts Everywhere!

Last week, I wrote about how I had just returned from the annual Postman users’ conference, and how I was so excited about everything I had learned there!  I’m still talking to anyone who will listen about all the great things Postman can do.  In this week’s post, I’m going to show you how you can create variables, assertions, and headers for collections and folders.

Those of you who are familiar with Postman or who have read my previous blog posts on the subject know that a Postman collection is simply a group of requests.  Requests in a collection can also be grouped into folders.  Here’s an example of a collection with more than one folder:

The name of the collection is “Contact List”, and it has three folders in it: “Happy Path”, “Required and Null Fields”, and “Sad Path”.  Each of the folders has requests in it, but currently only the “Happy Path” folder is open so you can view the requests.

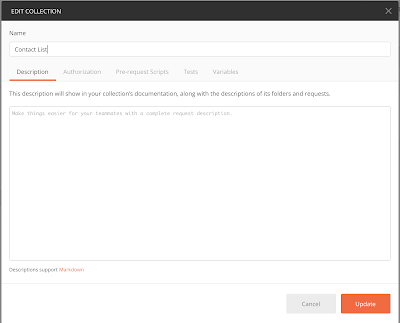
If I hover over the Contact List collection name, I’ll see a three-dot menu.  I can click on this menu icon and choose Edit.  When the Contact List editor window appears, it looks like this:

Notice that there are tabs for Authentication, Pre-request Scripts, Tests, and Variables.  If I want to add a collection-level variable, I can simply click on the variables tab and enter in my variable name and value.  We can do something similar to add an authorization token, a pre-request script, or a test.

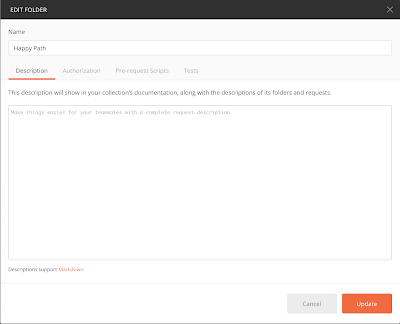
We can do the same thing at the folder level.  There is also a three-dot menu to the right of the “Happy Path” folder, and if I hover over either of the two other folders I’ll see the three-dot menu there as well.  If I click on the three-dot menu next to the “Happy Path” folder, and choose “Edit”, I’ll be presented with this window:

Looks familiar, doesn’t it?  The only difference between this folder window and the collection window is that there is no place to add variables.  Here I can add authentication, pre-request scripts, and tests, just as I could at the collection level or request level.

Why is this so helpful?  

Putting your authentication, pre-request scripts, and tests at the collection or folder level is helpful because it keeps you from having to type the same things again and again!

Here are four examples of how you can use this feature:

1. Assert on response time at the collection level

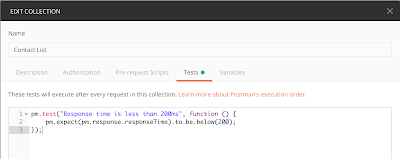
You may have a service-level agreement (SLA) on your API that states that the consumers of your API should get a response within a certain number of milliseconds.  Even if you don’t have an SLA, you probably want to be alerted if requests that used to take two milliseconds are now taking ten seconds to run.  But to copy and paste this assertion into every request is time consuming!  Instead you can put the assertion at the collection level, like this:

Now this response-time assertion will run with every single request in your collection.

2. Move your variables out of your environments and into your collections

You probably test your APIs in more than one environment, such as Dev, QA, Staging, and Production.  Each environment probably has some variables that differ between each environment, such as a URL value.  But there are probably many variables that stay the same in each environment, and these variables can be put at the collection level to avoid repetition.  Let’s look at an example.  Let’s say I have a set of variables for my QA environment:

And I have another set of variables for my Prod environment:

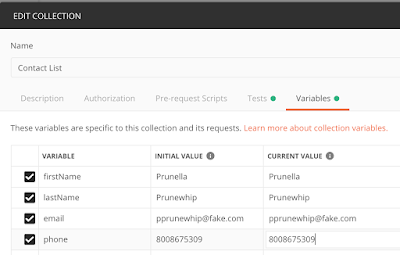
When you examine the two environments, you can see that the only variable that is different between the two is the URL.  So why not take the firstName, lastName, email, and phone variables and put them in the Collection variables instead?

Now you can remove all the repetitive variables from your environments, making them much easier to maintain.

IMPORTANT NOTE!  When you move your variables from an environment to your collection, you will need to reference them differently in your assertions.  Instead of:

pm.expect(jsonData.firstName).to.eql(environment.firstName);

You will need to use:

pm.expect(jsonData.firstName).to.eql(pm.variables.get(“firstName”));

3. Set authentication at the collection level

Much of what I test with APIs requires an authentication token.  It’s a pain to have to add authentication to the header on every request.  If the token you are using will be the same throughout your collection, you can set the authentication at the collection level instead. 

Here’s an example, using Mark Winteringham’s awesome Restful-Booker API.  Some of the requests in this API require a token, using this format:

Where {{cookie}} is the token that I’ve saved as a variable.  I can set the authentication at the collection level like this:

And that header will be sent with every request I make.  Note that there are many different types of authentication, so you’ll need to modify your collection settings to use the right type for your API. 

4. Use a pre-request script to create a variable at the folder level

Suppose you have a folder with requests that will all require a randomly-generated GUID, and you want the GUID to be different for each request.  Rather than put instructions for generating a GUID in the pre-request script section of every single request, you can put the instructions at the folder level, like this:

This script will run before every request in the folder and will assign a randomly-generated GUID to the variable “id”, ensuring that the id will be different for each request.
These examples are just some of the things you can do at the collection and folder levels.  I hope you will use these as a starting point to making your Postman tests more efficient and maintainable!

What I Learned at POST/CON Part I: Examples and Mocking

I’ve just returned from POST/CON, the annual Postman users’ conference, and I am so excited about everything I learned there!  So excited, in fact, that I’m going to devote not one, but TWO blog posts to sharing my findings.

If you aren’t already using Postman for your API testing, why on earth not?  It’s the best API testing tool out there!  My opinion was reinforced this week, when I learned just how easy it is to create API examples and mock responses.  I’ll be teaching you how to do both things in today’s post.

The instructions in this post will be for the free version of Postman, and I’ll be using version 7.  Your results will look slightly different in version 6; and the Pro version of Postman will have more functionality for the documentation and mocks than will be described here.

First, examples: why would you want to create an example of a request?  Because it’s a great way to show other people on your team how the request is supposed to work.  It can also be used to create documentation for your API. 

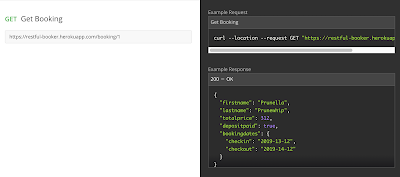
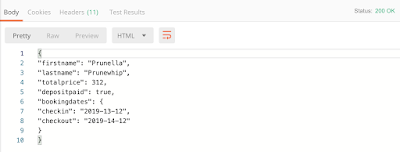
The request I’ll be using for today’s post is one of the GET requests from Mark Winteringham’s wonderful API, Restful-Booker.  Here is the request and the response:

You can see that this is a GET request that is asking for the booking with the ID of 1, and that the response returns the booking with the first and last name, checkin and checkout dates, and other details. 

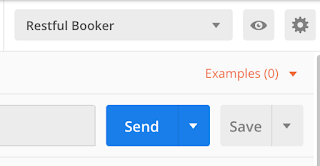
If we wanted to teach someone else on our team how this request works, we could simply share this request with them.  But- what if the API is still being created and doesn’t work yet?  Or what if our teammate doesn’t have the correct authentication access to the request, and can’t run it?  We can show them exactly what’s supposed to happen with the request by creating an example.  In the upper right corner of the Postman window, just underneath the environment dropdown, is a link that says “Examples”:

Click on this link, then click “Add Example”.  A new request tab will open up with the same name as the original GET request, prefaced by “e.g“:

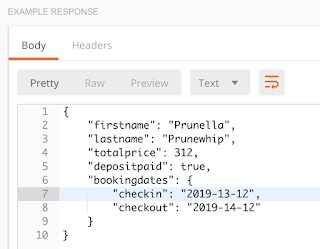
The request will already have the HTTP verb, the URL, and any headers or request parameters set.  All you need to do to finish the example is to paste in an example of what the request response should be:

and set the appropriate response code:

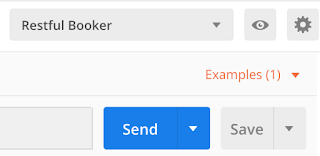
Save the example, and return to the original GET request.  You’ll see that now there is an example request listed in the top right:

Now anyone who sees the request can click on the Examples link to see exactly how the request is supposed to behave. 

Examples are also great for showing how an API request should behave in negative scenarios, such as when an id is not found, or when a user is not authenticated.

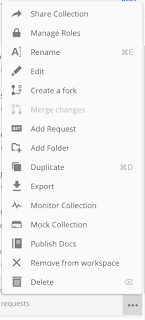
Another great feature of examples is that you can use them in your documentation.  You don’t need to have examples to create documentation, but it makes your documentation much easier to understand.  To create documentation in Postman, you need a collection with requests.  Click on the three-dot menu beside the collection, and choose “Publish Docs”:

A “Publish Collection” web page will open.  Select an environment if you like, and click the Publish Collection button.  Once published, you’ll see a URL that you can go to view your documentation.  Go to that URL, and you’ll see your request with your example response!

You can also use your example requests to create a mock server.  This can be used whenever you don’t have access to the actual API server, such as when a feature is still being developed or when you are doing contract testing with another API. 

To set up a mock server, simply click on the three-dot menu beside the collection name and choose “Mock Collection”.  You’ll be presented with a pop-up window like this:

Give your mock collection a name, and click the “Create mock server” button.  You’ll be assigned a special mock server that looks like this: https://<some guid>.mock.pstmn.io. 

This mock server is designed to return the response you created in your GET example whenever you make a request with an endpoint that matches the GET example.  Copy the URL for the mock server and paste it in a GET request, and then add the appropriate endpoint for your example: /booking/1.  Click send, and you should get this response:

Now you can save this request, naming it something like MOCK Get Booking, and you can save it to a collection called something like MOCK Restful Booker. 

You can create examples and mock requests like this for every request in an API, and when you have finished, you will have a complete documentation of your API as well as a mock server that will allow you call an API and get an appropriate response without actually connecting to the API’s server!

I hope you find this helpful in your work with APIs.  Next week, I’ll have more great knowledge from POST/CON to share!

Your Test Cases Are Slowing You Down

One of the first QA jobs I had was a position at a company that made software that could be used to create mobile applications.  It was a very complex application, with so many features that it was often hard to keep track of them all.  Shortly before I started working there, the company had adopted a test tracking system to keep track of all of the possible manual tests the team might want to run.  This amounted to thousands of test cases.

Many of the test cases weren’t written well, leaving those of us who were new to the team confused about how to execute them.  The solution to this problem was to assign everyone the task of revising the tests as they were run.  This helped a bit, but slowed us down tremendously.  Adding to the slowdown was the fact that every time we had a software release, our manager had to comb through all the tests and decide which ones should be run.  Then there was the added confusion of deciding which mobile devices should be used for each test.

We were trying to transition to an Agile development style, but the number of test cases and the amount of overhead needed to select, run, and update the tests meant that we just couldn’t adapt to the pace of Agile testing.

You might be thinking at this point, “Why didn’t they automate their testing?”  Keep in mind that this was back when mobile test automation was in its infancy.  One of our team had developed a prototype for an automated test framework, but we didn’t have the resources to implement it because we were so busy trying to keep up with our gigantic manual test case library.

Even when you have a robust set of automated tests in place, you’ll still want to do some manual testing.  Having a pair of eyes and hands on an application is a great way to discover odd behavior that you’ll want to investigate further.  But trying to maintain a vast library of manual tests is so time consuming that you may find that you don’t have time to do anything else!

In my opinion, the easiest and most efficient way to keep a record of what manual tests should be executed is through using simple spreadsheets.  If I were to go back in time to that mobile app company, I would toss out the test case management system and set up some spreadsheets.  I would have one smoke test spreadsheet; and one regression test spreadsheet for each major feature of the application.  Each time a new feature was added, I’d create a test plan on a spreadsheet, and once the feature was released, I’d either add a few test cases to a regression test spreadsheet (if the feature was minor), or I’d adapt my test plan into a new regression test spreadsheet for that feature.

This is probably a bit hard to imagine, so I’ll illustrate with an example.  Let’s say we have a mobile application called OrganizeIt!  Its major features are a To-Do List and a Calendar.  Currently the smoke test for the app looks like this:

Test iOS phone iOS tablet Android phone Android tablet
Log in with incorrect credentials
Log in with correct credentials
Add an event
Edit an event
Delete an event
Add a To-Do item
Edit a To-Do item
Complete a To-Do item
Mark a complete item as incomplete
Delete a To-Do item
Log out

And then we also have a regression test for the major features: Login, Calendar, and To-Do List.  Here’s an example of what the regression test for the To-Do List might look like:

Test Expected result
Add an item to the list with too many characters Error message
Add an item to the list with invalid characters Error message
Add a blank item to the list Error message
Add an item to the list with a correct number of valid characters Item is added
Close and reopen the application Item still exists
Edit the item with too many characters Error message, and original item still exists
Edit the item with invalid characters Error message, and original item still exists
Edit the item so it is blank Error message, and original item still exists
Mark an item as completed Item appears checked off
Close and reopen the application Item still appears checked off
Mark a completed item as completed again No change
Mark a completed item as incomplete Item appears unchecked
Mark an incomplete item as incomplete again No change
Close and reopen the application Item still appears unchecked
Delete the item Item disappears
Close and reopen the application Item is still gone

This test would also be run on a variety of devices, but I’ve left that off the chart to make it more readable in this post.
Now let’s imagine that our developers have created a new feature for the To-Do List, which is that items on the list can now be marked as Important, and Important items will move to the top of the list.  In the interest of simplicity, let’s not worry about the order of the items other than the fact that the Important items will be on the top of the list.  We’ll want to create a test plan for that feature, and it might look like this:

Test Expected result
Item at the top of the list is marked Important Item is now in bold, and remains at the top of the list
Close and reopen the application The item is still in bold and on the top of the list
Item at the middle of the list is marked Important Item is now in bold, and moves to the top of the list
Item at the bottom of the list is marked Important Item is now in bold, and moves to the top of the list
Close and reopen the application All important items are still in bold and at the top of the list
Every item in the list is marked Important All items are in bold
Close and reopen the application All items are still in bold
Item at the top of the list is marked as normal The item returns to plain text, and moves below the Important items
Close and reopen the application The item is still in plain text, and below the Important items
Item in the middle of the Important list is marked as normal The item returns to plain text and moves below the Important items
Item at the bottom of Important list is marked as normal The item returns to plain text and is below the Important items
Close and reopen the application All important items are still in bold, and normal items are still in plain text
Delete an important item Item is deleted
Close and reopen the application Item is still gone
Add an item and mark it as important The item is added as important, and is added to the top of the list
Add an item and mark it as normal The item is added as normal, and is added to the bottom of the list
Close and reopen the application The added items appear correctly in the list
Mark an important item as completed The item is checked, and remains in bold and at the top of the list
Close and reopen the application The item remains checked, in bold, and at the top of the list
Mark an important completed item as incomplete The item is unchecked, and remains in bold and at the top of the list
We would again test this on a variety of devices, but I’ve left that off the chart to save space.  
Once the feature is released, we won’t need to test it as extensively, unless there’s some change to the feature.  So we can add a few test cases to our To-Do List regression test, like this:

Test Expected result
Add an item to the list with too many characters Error message
Add an item to the list with invalid characters Error message
Add a blank item to the list Error message
Add an item to the list with a correct number of valid characters Item is added
Close and reopen the application Item still exists
Add an important item to the list Item is in bold, and is added to the top of the list
Edit the item with too many characters Error message, and original item still exists
Edit the item with invalid characters Error message, and original item still exists
Edit the item so it is blank Error message, and original item still exists
Mark an important item as normal Item returns to plain text and is moved to the bottom of the list
Mark an item as completed Item appears checked off
Mark an important item as completed Item remains in bold text and appears checked off
Close and reopen the application Item still appears checked off
Mark a completed item as completed again No change
Mark a completed item as incomplete Item appears unchecked
Mark an incomplete item as incomplete again No change
Close and reopen the application Item still appears unchecked
Delete the item Item disappears
Close and reopen the application Item is still gone
Delete an important item Item disappears
The new test cases are marked in red, but they wouldn’t be in the actual test plan.  
Finally, we’d want to add one test to the smoke test to check for this new functionality:

Test iOS phone iOS tablet Android phone Android tablet
Log in with incorrect credentials
Log in with correct credentials
Add an event
Edit an event
Delete an event
Add a To-Do item
Add an important To-Do item
Edit a To-Do item
Complete a To-Do item
Mark a complete item as incomplete
Delete a To-Do item
Log out
With spreadsheets like these, you can see how it is easy to keep track of a huge amount of tests in a small amount of space.  Adding or removing tests is also easy, because it’s just a matter of adding or removing a line to the table.  
Spreadsheets like this can be shared among a team, using a product like Google Sheets or Confluence.  Each time a smoke or regression test needs to be run, the test can be copied and named with a new date or release number (for example, “1.5 Release” or “September 2019”), and the individual tests can be divided among the test team.  For example, each team member could do a complete test pass with a different mobile device.  Passing tests can be marked with a check mark or filled in green, and failing tests can be marked with an X or filled in red.
And there you have it!  An easy to read, easy to maintain manual test case management system.  Instead of taking hours of time maintaining test cases, you can use your time to automate most of your tests, freeing up even more time for manual exploratory testing.  

Break Your App With This One Weird Trick

I missed a bug recently, more than once, and I’m kicking myself about it.  This post is about that bug and how you should make sure to always run a test for it. It’s also about how to keep from repeating your mistakes.

Here’s what happened: as I mentioned in a previous post, I’m currently testing file uploads and downloads.  When the developers on my team first coded the upload functionality, I dutifully tested all kinds of file names: long names, short names, names without extensions, names with capital letters, etc.  Everything looked great, but I missed one important test: testing file names with spaces.  Every file name I had tested with was one single word, like “sunrise.jpg”.  I forgot to test with a name like “Grand Canyon.jpg”, and as it turned out, uploads with spaces in them weren’t working correctly.

Spaces are SO easy to forget to test, because they are literally invisible!  Testing with spaces applies to any text fields, not just file names.  For example, when you are testing a first name field, make sure to test with two first names, like “Mary Jo”.

It’s also important to remember to test with a space at the beginning of the text and at the end of the text.  Your developer should be trimming these whitespaces when processing input, but if he or she forgets, this can mean trouble.  You may wind up with a situation where you have a list of names sorted by last name, and the name “Smith” is appearing at the top.  This is probably because someone entered ” Smith” with a leading space.

Similarly, your users might have problems logging in to your application, even though they are sure they have the right username.  This may be because when they set their username, they accidentally put a space at the end of the username, and that space was not trimmed by the developer.  So they are trying to log in with “catLover” when they should really be logging in with “catLover “.

Back to my story: after the bug with file uploads was discovered and fixed, I carefully retested uploads again, this time being sure to include file names with spaces in the beginning, middle, and end of the file.

Our next development task was to be able to resize a file upon request.  When this functionality was ready, I started running all kinds of tests: resizing by height only, width only, height and width, resizing various file types, etc.  While I was testing, the developer who worked on the feature mentioned that he had just discovered a bug: the files wouldn’t resize if they had spaces in the names, because the spaces weren’t being encoded properly.  I’d like to think I would have discovered this eventually, but who knows?  I was more focused on the new functionality than I was on regression testing.

The bug was fixed, and again I carefully tested it.  I added spaces in the beginning, middle, and end of the file name, and I used every kind of special character on my keyboard.  Surely, I thought, this must be the end of this bug.

Our next development task was to do file size and type checking.  We didn’t want to upload a file if it was larger than the application was told to expect, or if it had the wrong file type.  I tested with files with all kinds of sizes and types, and all kinds of mismatches.  With each mismatch, I verified that the file was checked and rejected.  I did a great deal of regression testing as well.  It occurred to me to test with different file names, but since this I had already verified that file names of all kinds were working with resizing, it seemed like overkill, so I chose not to do it.

I was wrong!  As it turned out, the system that was doing the file checking was different from the system that was doing the file resizing, and once again, spaces in the file name weren’t being encoded properly.  A developer noticed that every file that had spaces in the name wasn’t being checked by the system.  I was bitten by the file space bug once again.

I hate making mistakes, and I hate missing bugs!  Fortunately these bugs were caught before they impacted any end users.  But I like to learn from my mistakes, and I’ve taken the following steps to make sure I don’t miss this bug ever again:

  • I’ve put a sticky note that says “Spaces” on my desk.  Whenever I see it, I will be reminded to test for spaces in my inputs.  I did this years ago when I kept forgetting to test on different browsers.  I had a “Test on IE” note on my monitor, and it helped me develop the habit.
  • I’ve added file names with spaces to my saved Postman collections.  This way, even if I forget to test with spaces, the saved requests will remember for me.
  • I’ve written this blog post to serve as a cautionary tale to myself and others.
One final lesson I’ve learned from this is that different parts of the same feature can process information differently.  The feature is using new technologies that I’ve never tested before, and I assumed file names would be handled in the same way for uploads, resizes, and type checking. But that was not the case.  When you are dealing with new technologies, be sure to regression test everything, even things you think might not need to be covered.
It’s amazing how much one simple space can break!  When you are testing anything that can accept text, from a simple form field to a file upload, be sure to remember those invisible spaces.

Let’s Go Deep! Part III: Internet Routing

In the last two posts, we’ve been going deep, learning about how information is transmitted over the Internet.  In Part I, we learned how data is divided into packets, sent to its destination and reassembled.  In Part II, we learned how data sent over the Internet can be encrypted and protected.  But how does data know how to get from one IP address to another?  This is the subject of today’s post.

Every device that can be connected to the Internet has a network interface card (NIC), which is a piece of hardware installed on the device that allows it to make a network connection.  Each NIC has a media access control (MAC) address that is specific to only that device.

A modem is a device that connects to the Internet.  Other devices can connect to the modem in order to receive Internet transmissions.  A wireless router is capable of receiving wifi transmissions.  The router connects to the modem, and other devices connect wirelessly to the router in order to receive data from the Internet.  Many Internet service providers (ISPs) provide customers with a combination modem/router, which connects to the Internet and sends and receives wireless signals.

In Part I, we learned that every device connected to the Internet has an IP address.  An IP address is different from a MAC address in that the MAC address is assigned by the manufacturer of the device, and an IP address is assigned by the network.  An IP address has two sections, called the subnet and the host.  The subnet refers to one subsection of the entire Internet.  The host is the unique identifier for the device on the network.  The IP address combines these two numeric values using bitwise operations.  You can’t look at an IP address and say that the numbers on the left make up the subnet and the numbers on the right make up the host; it doesn’t work that way.  The IP address is more like a sum of two long numbers.

As mentioned in Part I, when a packet of data is sent from a server to a client, it is sent with the IP address of the destination.  In order to get to that destination, the packet will hop from one network to another.  The routing protocol of the Internet is called the Border Gateway Protocol (BGP).  This is a system that helps determine a route that will traverse the least number of networks to get to the destination.  Every router in a network has a series of routing tables, which are sets of directions for how to get from one network to another.

When a packet of information is first sent to the network’s router, it looks at the IP address of the destination and determines if the directions to the destination are available in the routing tables.  If they are not, the BGP is used to determine the next logical network where the packet should be sent.  A gateway is an entrance to a network, and a default gateway is the address that the request is sent to if there’s no knowledge of a specific address in that network.  When a packet arrives at the new gateway, the BGP calculates the next appropriate destination.

After traversing through networks in this way, eventually the packet arrives at the router for the network that contains the IP address of the destination.  The router determines the MAC address of the destination and sends the packet to that address.

One more important feature of networking is the use of a proxy server.  A proxy server is a server that is positioned between the client and the destination server.  It is configured so that any requests your client makes will go through the server before it gets to its destination.  There are many uses for a proxy server; the main use is to keep the actual address of a site or a router private.  Proxy servers can also be used by hackers to intercept requests, especially on a public network.  Finally, proxy servers are a great way to do security testing!  Using a tool like Fiddler or Burp Suite, you can intercept the requests that you make to your application and the responses you receive in return.  You can learn more about how to use Burp Suite in this post.

This concludes my three-part series on how the Internet works.  I hope that you have found it helpful, and that you can apply these concepts when testing!

Let’s Go Deep! Part II: Encryption, Tokens, and Cookies

In last week’s post, we talked about how HTTP works to pass information from a server to a browser.  But when information is passed back and forth between systems, we need to make sure that it’s protected from being intercepted by others for whom it was not intended.  That’s why HTTPS was created.  In this week’s post, we’ll talk about how encryption is used in HTTPS, what the difference is between cookies and tokens, the different types of cookies, and how cookies can be protected.

How HTTPS Works:
When two systems communicate with each other, we refer to them as the client and the server.  The client is the system making the request, such as a browser, an application, or a mobile device, and the server is the system that supplies the information, such as a datastore.  HTTPS is a method of securely transmitting information between the client and the server.  HTTPS uses SSL and TLS to encrypt the data being transmitted and decrypt it only when it arrives at its destination.  SSL (Secure Sockets Layer) and TLS (Transport Layer Security) are both tools for the encryption and decryption of data; TLS is a newer version of SSL.  
Here’s how TLS works: before any data is transmitted, the client and the server first perform a handshake.  The handshake begins with the client contacting the server with a suggested encryption method and the server responding back agreeing to use that encryption method.  It then continues with the client and the server swapping certificates.  A certificate is like an ID card; it verifies the identity of the client or server.  The certificates are checked against the CA (Certificate Authority), which is a third-party entity that creates certificates specifically for the purpose of HTTPS communication.  
Once the certificates are swapped and verified, the client and the server swap decryption keys, and the handshake is completed.  Now the data is encrypted, transmitted from the server to the client, and decrypted once it arrives at the client safely.  
Session Cookies and Tokens:

Another important way data is secured is through the use of session cookies or tokens.  Session cookies and tokens are strings that are passed in with a client’s request to verify that the person making the request has the right to see the data requested.  The main difference between session cookies and tokens is that a session cookie is stored both on the client and the server, and a token is only stored on the client.  
In systems that use tokens, the token is created when a user logs in.  The token is made up of encrypted information that identifies the user.  The token is stored in local storage in the client’s browser and is sent with every HTTPS request to the server.  When the server receives the token, it decrypts it, validates the user’s information, and then returns the response.  
The most popular system of tokens in use today is JWT (JSON Web Token).  You can read more about JWTs in this helpful documentation.  
A session cookie is a unique string that is created by the server when the user logs in.  It is saved in the server’s datastore as a session id.  The server returns the cookie to the client, and the client saves it in the browser while the session is active.  Whenever the client makes a request to the server, it sends the cookie with the request.  The server then compares the cookie with the one it has saved to make sure it matches before returning the response.  
Tokens and session cookies are usually set to expire after a period of time or after an event.  For example, a token issued might be good for one hour.  Just before the hour is up, a request can be made for a new token (called a refresh token) in order to keep the user signed in.  Session cookies usually expire when the user logs out or when the browser is closed.
Persistent Cookies:

Another type of cookie used is the persistent cookie, which is a bit of data saved on the server about the user’s preferences.  For example, if a user goes to a website and chooses German as the language they would like on the site, a persistent cookie will remember that information.  The next time the user goes to the site, the cookie will be examined and the site will load in German.  
Securing Cookies:

Because they are stored on the server, cookies are more vulnerable to being intercepted and used by someone other than the user than tokens are.  To help protect cookies, these flags (attributes) can be added to them at the time of creation:
  • Secure flag: ensures that the cookie can only be transmitted over HTTPS requests and not over HTTP requests.
  • HttpOnly flag: keeps a cookie from being accessed via JavaScript, which helps protect it from Cross-Site Scripting (XSS) attacks.  
  • SameSite flag: ensures that the cookie can only be sent from the original client that requested the cookie, which helps protect it from Cross-Site Request Forgery attacks.  

Hopefully this post has helped you learn how HTTPS works, and how tokens and cookies ensure a client’s validity.  Researching this information certainly helped me!  But I want to go deeper: how does a message know how to get from one IP address to another?  How are HTTP requests intercepted?  And how does a router work?  I’ll have answers to these questions in next week’s post!  

Let’s Go Deep! Part I: How HTTP Requests Work

Recently, an astute reader of my blog pointed me to a great post about the importance of having technical skills as a software tester.  The author makes an excellent analogy: a software tester who doesn’t understand technical concepts is like a surgeon who doesn’t understand anatomy.  If we are going to test our applications thoroughly, we should understand the underlying systems that make them work.

I freely admit that I am not an expert in networking, or even in how the Internet works.  But I’m willing to learn, and pass that information on to you!  So let’s go deep!  We’ll begin this week with how HTTP requests work.

When you type an website’s address into a Web browser, you are typing a URL.  A URL (Uniform Resource Locator) is simply a fancy name for a web address.  The URL contains a domain name.  The domain name identifies a specific grouping of servers on the Internet.  Examples of domain names would be google.com or amazon.com.
Once the browser has the domain name, it uses it to look up the associated IP address in the DNS (Domain Name System), which is a database that contains all the mappings of domain names and IP addresses.  An IP address (Internet Protocol address) is a unique series of numbers that is assigned to every device that is connected to the Internet.  
Once the IP address is known, a connection is opened to that address using HTTP.  HTTP (HyperText Transfer Protocol) is an application protocol that allows information to be transmitted electronically.  
Once the connection is opened to the server at the IP address, a request can be made to get information from that server.  Information sent over the Internet is called a message.  The request uses TCP (Transmission Control Protocol), which is a system of delivering messages over the Internet.  
The TCP divides a message into a series of packets, which are fragments of between 1000 and 3000 characters.  Each packet has a series of headers, which include the address of the packet’s destination, information about the ordering of the packets, and other important information.  
If for any reason a packet doesn’t make it to its destination, the client (the address making the request) can request a packet to be resent.  Once all the packets have arrived, the client reassembles them according to the instructions in the header.
It’s no secret that information sent over the Internet can be vulnerable to security attacks.  A malicious user can intercept HTTP requests and get sensitive information from them or manipulate them to make requests that will return sensitive information.  For this reason, data sent over the Internet is often encrypted or protected.  We’ll learn more about this in my next post, which will be on encryption, tokens, and cookies!