Let’s Go Deep! Part III: Internet Routing

In the last two posts, we’ve been going deep, learning about how information is transmitted over the Internet.  In Part I, we learned how data is divided into packets, sent to its destination and reassembled.  In Part II, we learned how data sent over the Internet can be encrypted and protected.  But how does data know how to get from one IP address to another?  This is the subject of today’s post.

Every device that can be connected to the Internet has a network interface card (NIC), which is a piece of hardware installed on the device that allows it to make a network connection.  Each NIC has a media access control (MAC) address that is specific to only that device.

A modem is a device that connects to the Internet.  Other devices can connect to the modem in order to receive Internet transmissions.  A wireless router is capable of receiving wifi transmissions.  The router connects to the modem, and other devices connect wirelessly to the router in order to receive data from the Internet.  Many Internet service providers (ISPs) provide customers with a combination modem/router, which connects to the Internet and sends and receives wireless signals.

In Part I, we learned that every device connected to the Internet has an IP address.  An IP address is different from a MAC address in that the MAC address is assigned by the manufacturer of the device, and an IP address is assigned by the network.  An IP address has two sections, called the subnet and the host.  The subnet refers to one subsection of the entire Internet.  The host is the unique identifier for the device on the network.  The IP address combines these two numeric values using bitwise operations.  You can’t look at an IP address and say that the numbers on the left make up the subnet and the numbers on the right make up the host; it doesn’t work that way.  The IP address is more like a sum of two long numbers.

As mentioned in Part I, when a packet of data is sent from a server to a client, it is sent with the IP address of the destination.  In order to get to that destination, the packet will hop from one network to another.  The routing protocol of the Internet is called the Border Gateway Protocol (BGP).  This is a system that helps determine a route that will traverse the least number of networks to get to the destination.  Every router in a network has a series of routing tables, which are sets of directions for how to get from one network to another.

When a packet of information is first sent to the network’s router, it looks at the IP address of the destination and determines if the directions to the destination are available in the routing tables.  If they are not, the BGP is used to determine the next logical network where the packet should be sent.  A gateway is an entrance to a network, and a default gateway is the address that the request is sent to if there’s no knowledge of a specific address in that network.  When a packet arrives at the new gateway, the BGP calculates the next appropriate destination.

After traversing through networks in this way, eventually the packet arrives at the router for the network that contains the IP address of the destination.  The router determines the MAC address of the destination and sends the packet to that address.

One more important feature of networking is the use of a proxy server.  A proxy server is a server that is positioned between the client and the destination server.  It is configured so that any requests your client makes will go through the server before it gets to its destination.  There are many uses for a proxy server; the main use is to keep the actual address of a site or a router private.  Proxy servers can also be used by hackers to intercept requests, especially on a public network.  Finally, proxy servers are a great way to do security testing!  Using a tool like Fiddler or Burp Suite, you can intercept the requests that you make to your application and the responses you receive in return.  You can learn more about how to use Burp Suite in this post.

This concludes my three-part series on how the Internet works.  I hope that you have found it helpful, and that you can apply these concepts when testing!

Let’s Go Deep! Part II: Encryption, Tokens, and Cookies

In last week’s post, we talked about how HTTP works to pass information from a server to a browser.  But when information is passed back and forth between systems, we need to make sure that it’s protected from being intercepted by others for whom it was not intended.  That’s why HTTPS was created.  In this week’s post, we’ll talk about how encryption is used in HTTPS, what the difference is between cookies and tokens, the different types of cookies, and how cookies can be protected.

How HTTPS Works:
When two systems communicate with each other, we refer to them as the client and the server.  The client is the system making the request, such as a browser, an application, or a mobile device, and the server is the system that supplies the information, such as a datastore.  HTTPS is a method of securely transmitting information between the client and the server.  HTTPS uses SSL and TLS to encrypt the data being transmitted and decrypt it only when it arrives at its destination.  SSL (Secure Sockets Layer) and TLS (Transport Layer Security) are both tools for the encryption and decryption of data; TLS is a newer version of SSL.  
Here’s how TLS works: before any data is transmitted, the client and the server first perform a handshake.  The handshake begins with the client contacting the server with a suggested encryption method and the server responding back agreeing to use that encryption method.  It then continues with the client and the server swapping certificates.  A certificate is like an ID card; it verifies the identity of the client or server.  The certificates are checked against the CA (Certificate Authority), which is a third-party entity that creates certificates specifically for the purpose of HTTPS communication.  
Once the certificates are swapped and verified, the client and the server swap decryption keys, and the handshake is completed.  Now the data is encrypted, transmitted from the server to the client, and decrypted once it arrives at the client safely.  
Session Cookies and Tokens:

Another important way data is secured is through the use of session cookies or tokens.  Session cookies and tokens are strings that are passed in with a client’s request to verify that the person making the request has the right to see the data requested.  The main difference between session cookies and tokens is that a session cookie is stored both on the client and the server, and a token is only stored on the client.  
In systems that use tokens, the token is created when a user logs in.  The token is made up of encrypted information that identifies the user.  The token is stored in local storage in the client’s browser and is sent with every HTTPS request to the server.  When the server receives the token, it decrypts it, validates the user’s information, and then returns the response.  
The most popular system of tokens in use today is JWT (JSON Web Token).  You can read more about JWTs in this helpful documentation.  
A session cookie is a unique string that is created by the server when the user logs in.  It is saved in the server’s datastore as a session id.  The server returns the cookie to the client, and the client saves it in the browser while the session is active.  Whenever the client makes a request to the server, it sends the cookie with the request.  The server then compares the cookie with the one it has saved to make sure it matches before returning the response.  
Tokens and session cookies are usually set to expire after a period of time or after an event.  For example, a token issued might be good for one hour.  Just before the hour is up, a request can be made for a new token (called a refresh token) in order to keep the user signed in.  Session cookies usually expire when the user logs out or when the browser is closed.
Persistent Cookies:

Another type of cookie used is the persistent cookie, which is a bit of data saved on the server about the user’s preferences.  For example, if a user goes to a website and chooses German as the language they would like on the site, a persistent cookie will remember that information.  The next time the user goes to the site, the cookie will be examined and the site will load in German.  
Securing Cookies:

Because they are stored on the server, cookies are more vulnerable to being intercepted and used by someone other than the user than tokens are.  To help protect cookies, these flags (attributes) can be added to them at the time of creation:
  • Secure flag: ensures that the cookie can only be transmitted over HTTPS requests and not over HTTP requests.
  • HttpOnly flag: keeps a cookie from being accessed via JavaScript, which helps protect it from Cross-Site Scripting (XSS) attacks.  
  • SameSite flag: ensures that the cookie can only be sent from the original client that requested the cookie, which helps protect it from Cross-Site Request Forgery attacks.  

Hopefully this post has helped you learn how HTTPS works, and how tokens and cookies ensure a client’s validity.  Researching this information certainly helped me!  But I want to go deeper: how does a message know how to get from one IP address to another?  How are HTTP requests intercepted?  And how does a router work?  I’ll have answers to these questions in next week’s post!  

Let’s Go Deep! Part I: How HTTP Requests Work

Recently, an astute reader of my blog pointed me to a great post about the importance of having technical skills as a software tester.  The author makes an excellent analogy: a software tester who doesn’t understand technical concepts is like a surgeon who doesn’t understand anatomy.  If we are going to test our applications thoroughly, we should understand the underlying systems that make them work.

I freely admit that I am not an expert in networking, or even in how the Internet works.  But I’m willing to learn, and pass that information on to you!  So let’s go deep!  We’ll begin this week with how HTTP requests work.

When you type an website’s address into a Web browser, you are typing a URL.  A URL (Uniform Resource Locator) is simply a fancy name for a web address.  The URL contains a domain name.  The domain name identifies a specific grouping of servers on the Internet.  Examples of domain names would be google.com or amazon.com.
Once the browser has the domain name, it uses it to look up the associated IP address in the DNS (Domain Name System), which is a database that contains all the mappings of domain names and IP addresses.  An IP address (Internet Protocol address) is a unique series of numbers that is assigned to every device that is connected to the Internet.  
Once the IP address is known, a connection is opened to that address using HTTP.  HTTP (HyperText Transfer Protocol) is an application protocol that allows information to be transmitted electronically.  
Once the connection is opened to the server at the IP address, a request can be made to get information from that server.  Information sent over the Internet is called a message.  The request uses TCP (Transmission Control Protocol), which is a system of delivering messages over the Internet.  
The TCP divides a message into a series of packets, which are fragments of between 1000 and 3000 characters.  Each packet has a series of headers, which include the address of the packet’s destination, information about the ordering of the packets, and other important information.  
If for any reason a packet doesn’t make it to its destination, the client (the address making the request) can request a packet to be resent.  Once all the packets have arrived, the client reassembles them according to the instructions in the header.
It’s no secret that information sent over the Internet can be vulnerable to security attacks.  A malicious user can intercept HTTP requests and get sensitive information from them or manipulate them to make requests that will return sensitive information.  For this reason, data sent over the Internet is often encrypted or protected.  We’ll learn more about this in my next post, which will be on encryption, tokens, and cookies!

Six Tips and Four Tools for File Upload Testing

I’ve been testing file uploads lately, which is always fun.  It’s also important, because uploading a malicious file is one of the ways that a bad actor can exploit your application, either by taking down your application, or by extracting sensitive data from it.  In this week’s post, I’ll offer six tips and four tools to help you be successful with testing file uploads.

Tip One: Upload Files With Allowed and Forbidden Extensions

The first step in testing file uploads is to find out what kinds of files will be allowed to be uploaded.  These files should be in the form of a whitelist, NOT a blacklist.  A whitelist specifies that only certain extensions will be allowed, whereas a blacklist specifies what is not allowed.  You can imagine that when a blacklist is used, there are dozens and dozens of file types that will be allowed, some of which you will not want in your application!  Therefore, it’s important to use a whitelist instead, which will be limited to the very few types of files that you want interacting with your application.  If your developers are not using a whitelist, please share this information with them.
Once you know what the whitelisted file types are, try uploading each type.  Then try uploading a wide variety of files that are not whitelisted.  Each of those files should be rejected with an appropriate error message for the user.
Tip Two: Upload Files With Inaccurate Extensions

One of the tricks malicious users employ to upload forbidden files is to rename a malicious file with an allowed extension.  For example, a bad actor could take a .js file and rename it as a .jpg file.  If .jpg files are allowed in your application, the file might be uploaded and then executed when opened by an unsuspecting user.  So it’s important for your application to have checks in place to not only verify the extension, but also to scan the file to verify its type.  
It’s easy to test this by simply taking a forbidden file, renaming it to have an allowed extension, and attempting to upload the file.  The file should be rejected with an appropriate error message.  The attempt should also be logged by the application, so if there is ever an upload attempt of this kind in production your security team can be alerted.
Tip Three: Test for Maximum File Size

Your application should specify a maximum file size.  Files that are too big can cause damage to your application either by slowing it down or causing it to crash, and can even cause data to be accidentally exposed, such as in a buffer overflow exploit.  
Find out what your application’s maximum file size is, and verify that files equal to and less than that size are uploaded appropriately.  Then verify that files over that maximum size are rejected with an appropriate error message.  Be sure to test with files just over the maximum size, and with files well over the maximum size.  
Tip Four: Test With Animated GIFs

Often when image uploads are allowed in an application, the .gif extension is one of the allowed types.  GIFs can sometimes contain animation.  Verify with your team whether your application will allow animated GIFs, and if not, verify what should happen if a user uploads one.  Will the file just display as a static image, or will the file be rejected?  Make sure that uploading an animated GIF does not result in a broken image on the page.  If animated GIFs are accepted, verify that it loads and displays the animation properly (see the next tip).  
Tip Five: Verify That the File Was Uploaded Correctly

It’s not enough to verify that you don’t get an error message when you upload a whitelisted file.  You also need to verify that the file was saved to the database correctly.  The easiest way to do this is to download the file and make sure it looks the same way it did when you uploaded it.  If your file should be displayed in the UI, you should make sure that the file looks correct in a browser or on a mobile device.  If an image that you uploaded should be resized on the page, make sure that it has resized correctly.  You don’t want to have other data obscured because someone uploaded an image that’s too large!  If you are expecting a video or audio file to play, make sure it’s playable. 
Tip Six:  Have a Folder With File Examples for Testing

My favorite tip is to have a folder filled with files of all kinds for use in testing.  I have a folder with tons of files with different extensions and a wide variety of sizes.  This way whenever I need to test file uploads, I’m ready to go with test files and I don’t have to waste time combing the internet for good examples to use.  
This brings me to my Four Tools for File Upload Testing!

I recently discovered this site when I realized that I needed some files with a .doc rather than a .docx extension.  This site definitely delivered, and it has many other example files as well.
I mentioned this tool in my Fifteen Free Tools to Help With Testing post.  When you need to test file size limitations, you can use this tool to create files of all different sizes.
This is an extensive, easy-to-read list of all the MIME types and their extensions.  It’s very helpful when you want to identify less common file types to test with, or when you are wondering what MIME type goes with a certain extension.  
Tool Four: Eicar Test File

If your application has virus-checking for uploaded files, you will want to use this test file.  It is a file that is designed to look like it has a virus, but it is actually virus-free.  You may find, however, that if your computer has virus-checking you won’t actually be able to download the file!  I was able to get around this by having someone send me the text of the file through chat, and then I pasted the text into the raw input window of Postman for my upload request.  
File uploads are one of my favorite things to test.  If you follow these tips and use these tools, it may become one of your favorites as well!

One Request, Sixteen Assertions

Anyone who has been reading my blog for a while knows that I’m passionate about API testing.  I’m also passionate about using Postman for API testing, because in my opinion it’s the easiest way to test API requests.  So it makes me sad when I see people testing an API and only asserting that they got a 200 response!  In this week’s post, I’m going to take a simple GET request and show examples of 16 assertions that could be run on the request.

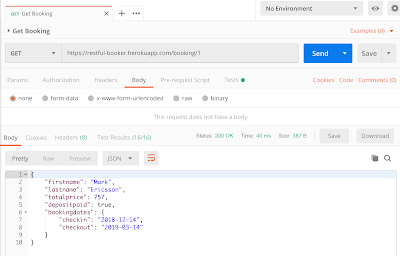
For the GET request, I’ll be using the wonderful Restful-Booker application created by Mark Winteringham to teach people how to do API testing.  The request URL I’ll be using is https://restful-booker.herokuapp.com/booking/1 which will retrieve the booking with the ID of 1. If you run this GET request in Postman, you’ll get a response like this:


The response has the first and last name of a hotel guest, the total price of their room, whether or not their deposit has been paid, and what their checkin and checkout dates are.

You may see different details in the response from those in the above image, because this is a site that is under frequent use as people practice making API requests to change booking information.

Let’s look at all the different assertions we can do on this response. To add these assertions yourself, click on the “Tests” tab just underneath the request URL.

1. First, we can add the most common assertion: asserting that the response code is correct.

pm.test(“Status code is 200”, function () { pm.response.to.have.status(200); });

The pm.test refers to “Postman test”. “Status code is 200” is the name of our assertion. And pm.response.to.have.status(200) is what we are expecting from the response.

2. We can also assert that the response comes back within a reasonable time frame, like this:

pm.test(“Response time is less than 1000ms”, function () { pm.expect(pm.response.responseTime).to.be.below(1000); });

This asserts that the response time is less than one second.

3-8. Next we can assert that expected headers are present:

pm.test(“Server header is present”, function () { pm.response.to.have.header(“Server”); }); pm.test(“Connection header is present”, function () { pm.response.to.have.header(“Connection”); });

pm.test(“Content-Length header is present”, function () { pm.response.to.have.header(“Content-Length”); }); pm.test(“Etag header is present”, function () { pm.response.to.have.header(“Etag”); }); pm.test(“Date header is present”, function () { pm.response.to.have.header(“Date”); }); pm.test(“Via header is present”, function () { pm.response.to.have.header(“Via”); });

These assertions are looking for the presence of a particular header rather than checking that the header has a specific value. The specific assertions above might not be particularly necessary, but sometimes it’s a good idea to assert that certain headers are in place, such as X-XSS-Protection (not in this API), which indicates that there are measures in place to protect from cross-site scripting.  

9-10.  We can also have assertions that validate that a specific header value is being returned:

pm.test(“X-Powered-By header value is Express”, function () {
    pm.response.to.be.header(“X-Powered-By”, “Express”);
});

pm.test(“Content-Type header value is application/json”, function () {
    pm.response.to.be.header(“Content-Type”, “application/json; charset=utf-8”);
});

The first assertion is validating that the server used is Express, and the second assertion is validating that the Content-Type of the response is application/json.

11.  We can assert that certain text is included in the body of the response:

pm.test(“Response contains last name”, function () {
    pm.expect(pm.response.text()).to.include(“lastname”);
});

In this assertion, I am validating that the text in the body of the response contains “lastname”.

12-13.  I can also assert that specific json fields exist in the response.  To do this, I first need to parse out the json in the response and save it to a variable:

var jsonData = pm.response.json();

Then I can assert on specific fields in the jsonData variable.  Here I am checking to make sure that the response has both a checkin field and a checkout field:

pm.test(“Response contains checkin date”, function () {
    pm.expect(jsonData.bookingdates.checkin).to.exist;
})

pm.test(“Response contains checkout date”, function () {
    pm.expect(jsonData.bookingdates.checkout).to.exist;

})

14-15. I can also assert that specific values are returned in the response:

var jsonData = pm.response.json();

pm.test(“Correct first name is returned in response”, function () { pm.expect(jsonData.firstname).to.eql(“Mark”); });

pm.test(“Deposit has been paid”, function () { pm.expect(jsonData.depositpaid).to.be.true; });

In this first assertion, I am validating that the value of the first name returned in the response is “Mark”. In the second assertion, I’m validating that “depositpaid” is true. Keep in mind that these values may actually change because others are using this API. When you add specific value assertions, you’ll want to be sure that your test data does not change; otherwise your tests will be flaky!

16. Finally, I can assert that a value is greater or less than a certain number:

var jsonData = pm.response.json();

pm.test(“Total price is greater than 100”, function () { pm.expect(jsonData.totalprice).to.be.above(100); });

In this case, I am asserting that the total price paid is greater than 100.

The types of assertions that you run on your API responses will vary depending on what is important for you to test. While you may not decide that all types are appropriate for your API, I hope that these examples show that there are many more things to assert on than simply “200 OK”!


Stop Writing So Many UI Tests!

If you were to guess the importance of various types of automated tests by looking at the number of tutorials and articles about them on the Web, you’d think that UI tests were the most important.  But this is not the case- so much of an application can be tested through other means, especially API tests.  API tests are faster and much less flaky than UI tests, and they’re easier to write as well!  Below are four types of tests that are better suited for API testing.

Login Tests:  It’s easy to cycle through all kinds of username and password combinations with API tests.  The response time from a POST to a login endpoint is lightning fast, as opposed to a UI test which has to wait for the username and password fields to be populated and wait for the login response to reach the browser.  To prove this, I created a Postman collection that had sixteen login tests with various user and password combinations.  The sixteen tests ran in less than three seconds!  Imagine how long the equivalent UI tests would take.  
However, you should have two automated UI tests: one that validates that the login page looks correct, and that the user is able to log in, and one that validates that an appropriate error message is displayed when the user attempts to log in with bad credentials.
CRUD Tests:  When you’re testing CRUD functionality, you’re testing how your application interacts with the underlying data store.  This is best done at the API level.  It’s easy to create GET, POST, PUT, and DELETE tests using a tool like Postman.  You can assert on both the response codes and the body of the response (if any), and you can also do GETs to assert that your POSTs, PUTs, and DELETEs have saved correctly to the database.
The only UI tests you need in this area are one that demonstrates that form fields can be filled out and submitted, and one that shows that data is displayed correctly on the page.
Negative Tests:  API testing is great for negative tests, because not only can you run through all kinds of negative scenarios very quickly, but you can also run tests that aren’t possible in the UI.  For example, let’s say that your form has a required field.  In the UI, you can’t do a test where you submit a new record without that required field, because the UI simply won’t let you.  But in the API, you can do a POST without the required field and verify that you are getting a 400-level response.  API testing is also great for checking application security, because malicious users are likely to try to attack the application at this level.  
Here is just a sampling of the types of negative tests you can run with API testing:
  • sending in an inaccurate URL
  • trying a request without appropriate authentication
  • testing for IDOR
  • sending in incorrect headers
  • sending in a request without a required field
  • trying a request with a field value that violates type or length constraints
  • verifying that the correct 400-level error is displayed when a request is invalid
For UI testing, you’ll simply want to verify that appropriate errors are displayed on the page when you leave a required field blank or violate a field constraint.  Everything else can be covered by API tests.
Tests of Complicated Business Logic:  If you have an area of your application that requires an extensive setup of data and complicated business logic, it’s much easier to test with an API than with the UI.  Consider my hypothetical Superball Sorter, which sorts balls of various colors and sizes among four children.  Setting up the rules through the UI in an automated test would be tedious; assuming each child had a dropdown picker for size and color, you’d need to do a lot of element selection.  But if the Superball Sorter had an API that could set all the rules for the children in a single POST, it would take milliseconds to prepare the test.  
Similarly, after the sorting has been run, a UI test would need to grab all the responses on the page to validate that the balls have been sorted correctly, where an API could do a GET request for each child and validate that the appropriate balls are returned.  Four GET requests will most likely be returned and validated before a UI test could validate a single child’s values.  
Now that you have seen the many ways that API tests can be used, I hope that you will take the time to look at your current UI test suite to see which tests could be shifted to API testing.  Your automation suite will be faster, more reliable, and easier to maintain as a result!

The Easiest MongoDB Tutorial on the Web

MongoDB is one of the most popular non-relational databases in use today.  Its versatility, speed, and scalability make it popular with applications that need to store data in a JSON-like format.  It’s very easy to install MongoDB and create a database, but the query language it uses is quite different from the SQL query language.  When I first started using MongoDB, I was frustrated by the documentation I found on queries; either they tried to explain too much or the examples were too complicated.  More than once I said things in frustration like “How can I simply ask for ‘select lastName from contacts where id = 3?!!'”.

It is because of this frustration that I have created this tutorial.  In the tutorial, I’ll be including several really simple examples of queries that you are probably used to running in SQL. 

Installing Mongo:

Because this post is really about writing queries, I’m going to skip the installation instructions, and instead send you here for MacOSX and here for Windows.  Once you have finished the installation instructions, you should have a command window open that is running mongo.

Creating a Database:
Creating a new database is unbelievably easy.  We’re going to name our new database tutorial.  To create it, simply type use tutorial.  You’ll get the response switched to db tutorial.  Tada!  Your database is created.

Adding a Document:
Of course, right now your database is completely empty.  Let’s change that by typing
db.tutorial.insertOne( { _id: 1, firstName: “Prunella”, lastName: “Prunewhip” } ).  
You will get a response of 
{ “acknowledged” : true, “insertedId” : 1 }
You have just added your first document!  Note that a “document” is the equivalent of a “record” in a SQL database.  Your document has an id (which is preceded by an underscore, by convention), a first name, and a last name.

Retrieving All Documents:
Let’s make sure that your document was really added by asking for it.  Type 
db.tutorial.find() 
and you should get this as a result: 
{ “_id” : 1, “firstName” : “Prunella”, “lastName” : “Prunewhip” }
The empty find() command will find all of the documents in the database.  At the moment, we only have one document, so that’s all that was returned.

Adding Multiple Documents:
To add several documents at the same time, use the InsertMany command, like this:

db.tutorial.insertMany([ { _id: 2, firstName: “Joe”, lastName: “Schmoe” }, { _id: 3, firstName: “Amy”, lastName: “Smith” }, { _id: 4, firstName: “John”, lastName: “Smith” }, { _id: 5, firstName: “Joe”, lastName: “Bagadonuts” }, { _id: 6, firstName: “Carol”, lastName: “Jones” }, { _id: 7, firstName: “Robert”, lastName: “Johnson” } ])

Note that each document is wrapped in curly braces, separated by commas.  You’ll get a response like this: 
{ “acknowledged” : true, “insertedIds” : [ 2, 3, 4, 5, 6, 7 ] }
Now you have seven records in your database.

If you retrieve all documents at this point using db.tutorial.find(), you’ll get a result like this:
{ “_id” : 1, “firstName” : “Prunella”, “lastName” : “Prunewhip” }
{ “_id” : 2, “firstName” : “Joe”, “lastName” : “Schmoe” }
{ “_id” : 3, “firstName” : “Amy”, “lastName” : “Smith” }
{ “_id” : 4, “firstName” : “John”, “lastName” : “Smith” }
{ “_id” : 5, “firstName” : “Joe”, “lastName” : “Bagadonuts” }
{ “_id” : 6, “firstName” : “Carol”, “lastName” : “Jones” }
{ “_id” : 7, “firstName” : “Robert”, “lastName” : “Johnson” }

Retrieving a Single Document:
To retrieve a single document, use this syntax:
db.tutorial.find( { _id: 1 } ).  
This will return the document with the id of 1: 
{ “_id” : 1, “firstName” : “Prunella”, “lastName” : “Prunewhip” }

Search for All Documents With a Single Value:
The previous search on id will always return just one document, because the id is unique.  If you want to search for all documents that have a particular value, you can use 
db.tutorial.find({ lastName: “Smith”}).  
This will return all documents that have the last name Smith:
{ “_id” : 3, “firstName” : “Amy”, “lastName” : “Smith” }
{ “_id” : 4, “firstName” : “John”, “lastName” : “Smith” }

Search for One Value in One Document:
Let’s say you want to find the last name of the document with the id of 3.  To do this, type:
db.tutorial.find({ _id: 3}, {lastName:1, _id:0}).  
You will get this result:  
{ “lastName” : “Smith” }
The _id:0 is there to specify that you don’t want the id returned in the response; returning the id in the response is a default behavior in MongoDB.

Return All the Values for a Specific Field:
If you wanted to get a list of all the last names in your database, you would use
db.tutorial.find({}, {lastName:1, _id:0}).  
This would return
{ “lastName” : “Prunewhip” }
{ “lastName” : “Schmoe” }
{ “lastName” : “Smith” }
{ “lastName” : “Bagadonuts” }
{ “lastName” : “Jones” }
{ “lastName” : “Johnson” }

Search with “Starts With”:
MongoDB uses regex to search on field values.  To search for all the documents that have last names that begin with S, you’d do this search:
db.tutorial.find({ lastName: /^S/}).  
This will return 
{ “_id” : 2, “firstName” : “Joe”, “lastName” : “Schmoe” }
{ “_id” : 3, “firstName” : “Amy”, “lastName” : “Smith” }
{ “_id” : 4, “firstName” : “John”, “lastName” : “Smith” }

Search with “And”:
If you wanted to search for a document that had a specific first name AND a specific last name, you’d search like this:
db.tutorial.find( {$and: [{ lastName: “Smith” },{ firstName: “Amy”}]} )
which would return 
{ “_id” : 3, “firstName” : “Amy”, “lastName” : “Smith” }.

Search with “In”:
To search for all the documents that have either the last name Smith or the last name Jones, you’d use:
db.tutorial.find({lastName :{$in :[“Smith”,”Jones”]}}).  
This will return
{ “_id” : 3, “firstName” : “Amy”, “lastName” : “Smith” }
{ “_id” : 4, “firstName” : “John”, “lastName” : “Smith” }
{ “_id” : 6, “firstName” : “Carol”, “lastName” : “Jones” }

Update a Document:
If you’d like to change an existing document, you can use the Update command.  For example, to change the last name of the third document from Smith to Jones, you would type:
db.tutorial.updateOne({_id: 3 }, {$set: {lastName: “Jones”}}).  
You’ll get this response: 
{ “acknowledged” : true, “matchedCount” : 1, “modifiedCount” : 1 }.

To verify that the record was updated correctly, you can use db.tutorial.find( { _id: 3 } ), which will return { “_id” : 3, “firstName” : “Amy”, “lastName” : “Jones” }.

Delete a Document:
Finally, there may be times where you want to delete a document.  This can be done with
db.tutorial.deleteOne({_id: 4 })
which will return a response of 
{ “acknowledged” : true, “deletedCount” : 1 }.

To verify that the document has been deleted, you can run db.tutorial.find() and get this response:
{ “_id” : 1, “firstName” : “Prunella”, “lastName” : “Prunewhip” }
{ “_id” : 2, “firstName” : “Joe”, “lastName” : “Schmoe” }
{ “_id” : 3, “firstName” : “Amy”, “lastName” : “Jones” }
{ “_id” : 5, “firstName” : “Joe”, “lastName” : “Bagadonuts” }
{ “_id” : 6, “firstName” : “Carol”, “lastName” : “Jones” }
{ “_id” : 7, “firstName” : “Robert”, “lastName” : “Johnson” }
and you can see that the document with the id of 4 is no longer in the database.

This is by no means a complete record of everything that you can do with MongoDB, but it should be enough to get you started.  You can also refer to last week’s post to get a few examples of interacting with nested values in MongoDB.  I hope that you will find today’s post helpful in understanding how Mongo works, and that you will use it as a reference whenever you need it.  Happy querying!

Testing With Non-Relational Databases

Last week, I took a look at ways to query relational databases for testing.  This week I’m going to look at non-relational databases, describe how they are different from relational databases, and discuss how to query them in your testing.  Non-relational databases, such as MongoDB and DynamoDB, are sometimes called “NoSQL” databases, and are becoming increasingly popular in software applications.

The main difference between relational and non-relational databases is that relational databases use tables to store their data, where non-relational tables use documents.  The documents are often in JSON format.  Let’s take a look at what the records in the Contacts table from last week’s post would look like if they were in a non-relational database:

{
              contactId: “10000”,
              firstName: “Prunella”,
              lastName: “Prunewhip”,
              email: “pprunewhip@fake.com”,
              phone: “8005551000”,
              city: “Phoenix”,
              state: “AZ”
}
{
              contactId: “10001”,
              firstName: “Joe”,
              lastName: “Schmoe”,
              email: “jschmoe@alsofake.com”,
              state: “RI”,
}
Note that Joe does not have a value for phone or city entered, so they are not included in his document.  This is different from relational databases, which are required to include a value for every field. Instead of having a NULL value for phone and city as Joe’s record did in the SQL table, those fields are simply not listed.
Another key difference between relational and non-relational databases is that it’s possible to add a new field into a table without adding it in for every document.  Let’s imagine that we are adding a new record to the table, and we want that record to include a spouse’s name.  When that record is added, it will look like this:

{
              contactId: “10002”,
              firstName: “Amy”,
              lastName: “Smith”,
              email: “amysmith@faketoo.com”,
              phone: “8885551001”,
              city: “Boise”,
              state: “ID”,
              spouse: “John”
}
The original documents, 10000 and 10001, don’t need to have this spouse value.  In a relational database if a new field is added, the entire schema of the table needs to be altered, and Prunella and Joe will need to have spouse values or NULL entered in for those fields.

With a non-relational database, it’s not possible to do joins on table data as you saw in last week’s post.  Each record should be treated as its own separate document, and you can do queries to retrieve the documents you want.  What that query language looks like depends on the type of the database used.  The examples below are using MongoDB’s query language, which is JavaScript-based, and are querying on the documents listed above:

db.contacts.find() – this will return all the contacts in the table
db.contacts.find( { contactId: “10001” } ) – this will return the document for Joe Schmoe

To make the responses easier to read, you can append the command .pretty(), which will organize the data returned in JSON format rather than a single line of values. 

You can also run a query to return a single field for each document:

db.contacts.find({}, {firstName:1, _id:0}) – this will return just the first name for each contact

Because the documents in a non-relational database have a JSON-like structure, it’s possible to have documents with arrays.  For example, our Contacts table could have a document that lists the contact’s favorite foods:

{
              contactId: “10000”,
              firstName: “Prunella”,
              lastName: “Prunewhip”,
              email: “pprunewhip@fake.com”,
              phone: “8005551000”,
              city: “Phoenix”,
              state: “AZ”,
              foods: [ “pizza”, “ice cream” ]
}

It’s even possible to have objects within arrays, as follows:

{
              contactId: “10001”,
              firstName: “Joe”,
              lastName: “Schmoe”,
              email: “jschmoe@alsofake.com”,
              state: “RI”,
              pets: [ { type: “dog”, name: “fido” }, { type: “cat”, name: “fluffy” } ]
}

You can see how this type of data storage might be advantageous for your application’s data.  Nesting data in this fashion makes it easier to read at a glance than it would be in a relational database, where the pets might be in their own separate table.

To run a query that will return all the contacts that have cats, you would simply request:

db.contacts.find( {“pets.type”:”cat”} )

To run a query that will return all the contacts that have cats named Fluffy, you would request:

db.contacts.find( {$and: [{“pets.type”:”cat”},{“pets.name”:”fluffy”}]} )

These are just a few simple examples of how to query data with a non-relational database, and they should be enough to get you started in your testing.  To learn more, be sure to read the documentation for the type of database you are using.  As non-relational databases become increasingly popular, this knowledge will be extremely useful.  

Testing With Relational Databases

In last week’s post, I discussed various ways to test your application’s database.  In order to verify that your data has been saved correctly, you’ll need to query the database, and the way to query the database will depend on what type of database you have.  In the past, most databases were relational, but in recent years there has been a trend towards using non-relational databases.  In this week’s post, I’ll address relational databases, and in next week’s post, I’ll talk about non-relational databases.

Relational databases, such as MySQL and Microsoft SQL Server, are based on tables.  Each table relies on a schema, which defines what columns will be in the table, what data types they will have, and which columns will accept null values.  Here’s an example of a typical SQL table:

contactId
firstName
lastName
email
phone
city
state
10000
Prunella
Prunewhip
pprunewhip@fake.com
8005551000
Phoenix
AZ
10001
Joe
Schmoe
jschmoe@alsofake.com
NULL
NULL
RI

Note that there are seven different columns in the table.  The first column in the table, contactId, is the primary key for the table. This will be a unique value; there will never be two contactIds with the same value. 

With a relational database, the schema remains unchangeable, so when Joe Schmoe is added to the database without a phone or city, those places in the table need to be filled with NULL.

Tables in a relational database can connect to each other.  Here is a table in the same database that shows the contact’s favorite foods:

foodId
contactId
food
1
10000
Pizza
2
10000
Ice cream
3
10001
Sushi

In this table the primary key is the foodId.  But notice that the contactId is present in this table.  The contactId here is the same as the contactId in the first table.  So we can see in this table that Prunella has two different favorite foods, pizza and ice cream, and Joe’s favorite food is sushi.

When testing a relational database, you can use SQL query language to verify that the values you are looking for are present in the database.  For example, if you had just added a new contact with the name of Amy Smith to the Contacts table, you could query the database to see if it had been added, like this:

select * from Contacts where lastName = ‘Smith’ and firstName = ‘Amy’

and the query would return a table row in response:

contactId
firstName
lastName
email
phone
city
state
10003
Amy
Smith
amysmith@faketoo.com
8885551001
Boise
ID

In the above query, the asterisk * tells SQL that we want all of the columns for the record returned.

Because this is a relational database, you could also do a query with a join.  A SQL join combines the data from two tables, joining on a column that they have in common.  

In the example above, both columns have the contactId column.  Let’s say that you have given your new contact Amy a favorite food (chocolate), and you want to verify that it saved to the database correctly, but you don’t know what Amy’s contactId is.  You can’t just query the Food table for “Amy Smith” because her first and last names aren’t in there.  And you can’t query the Contacts table for the food, because it’s not in that table.  But you could query the Contacts table with that information, get the contactId from that, and then use the contactId to query the Food table for the favorite food.  

This is what such a query would look like:

select food from Foods 
inner join on Contacts 
where Foods.contactId = Contacts.contactId 
and Contacts.firstName  = ‘Amy’
and Contacts.lastName = ‘Smith’ 

and the query will return this response:

food
Chocolate

  
Let’s walk through what happens in the query.
select food from Foods – this tells SQL to return just the food column from the Foods table
inner join on Contacts – this tells SQL that the query will be joining information from the Foods table with information from the Contacts table
where Foods.contactId = Contacts.contactId – this is instructing SQL to find the contactIds in the Foods table and match them up with the contactIds from the Contacts table
and Contacts.firstName  = ‘Amy’ and Contacts.lastName = ‘Smith’  – these last two lines are telling SQL that we are only interested in the record with the first name Amy and the last name Smith 

There are many more complicated ways to query a relational database, but with these two query types you will be able to do most of your data validation.  

Be sure to check out next week’s post, where I’ll talk about how to test with non-relational databases!

Database Testing

As software testers we often take for granted the fact that our application has a database behind it.  We tend to focus on the visible, such as the user interface, or the application logic of the API when we are testing.  But it’s important to test the database as well!  Below are six ways to test your application’s database.

1. Verify that the data fields are the correct type

Each data field in the database will be a specific type, such as int, float, string, or datetime.  Verify that each field’s datatype is appropriate.  For example, a date field in the application should be saved as a datetime type rather than as a string.  This might not seem like a big deal, but if sorting functionality is added to the application, you’ll find that April 10 is sorted before January 11 because the dates are being sorted alphabetically.

2. Verify that the fields that are required in the database are also required in the API and the UI

Generally each record in a database will have some fields that are required.  If a field is required in the database, it should also be required in the API and the UI.  If the UI doesn’t set the last name field as required, but the database has set it as required, a user could submit a new record without a last name and the database will return an error.

3. Verify that the parameters set on the fields in the database match the parameters in the API and the UI

Data fields in a database will have specific limits set, such as a character limit for a string, or a maximum value for an int. The fields in the API and the UI should have the same limits.  If the limits do not match, confusion can ensue.  Let’s say for example that your application has a field for a street address.  In the UI the developer has set the character limit to 50 characters, but in the database, the limit is set to 40.  If a user types in a street address with 45 characters, the UI will accept that value, but the database will not.  This will result in the record not being saved, and it won’t be obvious to the user what the problem is.

4. Verify that sensitive data, such as user passwords, are encrypted in the database

I once worked for a company that did not encrypt their user passwords.  I had access to the production database, which meant that I could see the username and password for every single customer of the company.  It should be pretty obvious that this was a huge security risk!  Passwords should always be encrypted in the database so there is no way for anyone but the user to know what their password is.

5. Verify that your database supports all your API’s operations

Just because your POST request returns a 200 doesn’t mean that the data was saved to the database correctly.  When you make an API request, make sure that the database saved every field correctly.  I have seen situations where a PUT request did not result in every new value being saved to the database.  I’ve also seen a situation where a PATCH request updated the correct fields, but set every other field to null!  Be sure to test every available CRUD operation, and check every field for accuracy.  Also make sure to change field values from null to an entry, and from an entry to null.  If a field you are testing is a string, determine with your team whether empty strings will be allowed, and test going from null to an empty string, an empty string to a value, from a value to an empty string, and so on.

In addition, if your API is going to support the DELETE operation, find out from your team whether those deletes will be hard-deletes, meaning that the record will be completely removed from the database, or soft-deletes, meaning that the record stays in the database, but is moved to another table or stays in the existing table with a “deleted” flag set.  Then test the DELETE operation to verify that it is behaving as expected.

6. Verify that leading and trailing spaces are removed when saving to the database

Have you ever had trouble logging in to an application where you are sure you have the right username?  The problem could be that when the username was originally created, a trailing space was accidentally added, and it was saved to the database with the extra space.  When you tried to log in as “doglvr49”, the system was expecting “doglvr49 “.  Similarly, if you entered a contact’s last name as ” Jones” instead of “Jones” and the leading space wasn’t trimmed, and you tried to sort the contacts alphabetically, you’d find ” Jones” before “Allan”.  When you are testing text fields in your application, try testing them with leading and trailing whitespaces, and then verify in the database that those spaces have been trimmed.

Issues such as having a mismatch between character limits in the database and the UI, or having a string instead of an int, or having trailing spaces in a record, can seem like small issues, but they can result in big problems.  By following these six steps in database testing, you will help ensure that your end users will have a good experience entering and retrieving data.