Three Ways to Test Output Validation

Last week, I wrote about the importance of input validation for the security, appearance, and performance of your application.  An astute reader commented that we should think about output validation as well.  I love it when people give me ideas for blog posts!

There are three main things to think about when testing outputs:

1. How is the output displayed?  

A perfect example of an output that you would want to check the appearance of is a phone number.  Hopefully when a user adds a phone number to your application’s data store it is being saved without any parentheses, periods, or dashes.  But when you display that number to the user, you probably won’t want to display it as 8008675309, because that’s hard to read.  You’ll want the number to be formatted in a way that the user would expect; for US users, the number would be displayed as 800-867-5309 or (800) 867-5309.

Another example would be a currency value.  If financial calculations are made and the result is displayed to the user, you wouldn’t want the result displayed as $45.655, because no one makes payments in half-pennies.  The calculation should be rounded or truncated so that there are only two decimal places.

2. Will the result of a calculation be saved correctly in the database?

Imagine that you have an application that takes a value for x and a value for y from the user, adds them together, and stores them as z.  The data type for x, y, and z is set to tinyint in the database.  If you’re doing a calculation with small numbers, such as when x is 10 and y is 20, this won’t be a problem.  But what happens if x is 255- the upper limit of tinyint- and y is 1?  Now your calculated value for z is 256, which is more than can be stored in the tinyint field, and you will get a server error.

Similarly, you’ll want to make sure that your calculation results don’t go below zero in certain situations, such as an e-commerce app.  If your user has merchandise totaling $20, and a discount coupon for $25, you don’t want to have your calculations show that you owe them $5!

3. Are the values being calculated correctly?

This is especially important for complicated financial applications. Let’s imagine that we are testing a tax application for the Republic of Jackvonia.  The Jackvonia tax brackets are simple:

Income Tax Rate
$0 – $25,000 1%
$25,001 – $50,000 3%
$50,001 – $75,000 5%
$75,001 – $100,000 7%
$100,001 and over 9%

There is only one type of tax deduction in Jackvonia, and that is the dependents deduction:

Number of Dependents Deduction
1 $100
2 $200
3 or more $300

The online tax calculator for Jackvonia residents has an income field, which can contain any dollar amount from 0 to one million dollars; and a dependents field, which can contain any whole number of dependents from 0 to 10.  The user enters those values and clicks the “Calculate” button, and then the amount of taxes owed appears.

If you were charged with testing the tax calculator, how would you test it?  Here’s what I would do:

First, I would verify that a person with $0 income and 0 dependents would owe $0 in taxes.

Next, I would verify that it was not possible to owe a negative amount of taxes: if, for example, a person made $25,000 and had three dependents, they should owe $0 in taxes, not -$50.

Then I would verify that the tax rate was being applied correctly at the boundaries of each tax bracket.  So a person who made $1 and had 0 dependents should owe $.01, and a person who made $25,000 and had 0 dependents should owe $250.  Similarly, a person who made $25,001 and had 0 dependents should owe $750.03 in taxes.  I would continue that pattern through the other tax brackets, and would include a test with one million dollars, which is the upper limit of the income field.

Finally, I would test the dependents calculation. I would test with 1, 2, and 3 dependents in each tax bracket and verify that the $100, $200, or $300 tax deduction was being applied correctly. I would also do a test with 4, 5, and 10 dependents to make sure that the deduction was $300 in each case.

This is a lot of repetitive testing, so it would definitely be a good idea to automate it. Most automation frameworks allow a test to process a grid or table of data, so you could easily test all of the above scenarios and even add more for more thorough testing.

Output validation is so important because if your users can’t trust your calculations, they won’t use your application!  Remember to always begin with thinking about what you should test, and then design automation that verifies the correct functionality even in boundary cases.

Four Reasons You Should Test Input Validation (Even Though It’s Boring)

When I first started in software testing, I found it fun to test text fields.  It was entertaining to discover what would happen when I put too many characters in a field.  But as I entered my fourth QA job and discovered that once again I had a contact form to test, my interest started to wane.  It’s not all that interesting to input the maximum amount of characters, the minimum amount of characters, one too many characters, one too few characters, and so on for every text field in an application!

However, it was around this time that I realized that input validation is extremely important.  Whenever a user has the opportunity to add data in an application, there is the potential of malicious misuse or unexpected consequences.  Testing input validation is a critical activity for the following four reasons:

1. Security

Malicious users can exploit text fields to get information they shouldn’t have.  They can do this in three ways:

  • Cross-site scripting– an attacker enters a script into a text field.  If the text field does not have proper validation that strips out scripting characters, the value will be saved and the script will then execute automatically when an unsuspecting user navigates to the page.  The executed script can return information about the user’s session id, or even pop up a form and prompt the user to enter their password, which then gets written to a location the attacker has access to.
  • SQL injection– if a text field allows certain characters such as semicolons, it’s possible that an attacker can enter values into the field which will fool the database into executing a SQL command and returning information such as the usernames and passwords of all the users on the site.  It’s even possible for an attacker to erase a data table through SQL injection.
  • Buffer overflow attack- if a variable is configured to have enough memory for a certain number of characters, but it’s possible to enter a much larger number of characters into the associated text field, the memory can overflow into other locations.  When this happens, an attacker can exploit this to gain access to sensitive information or even manipulate the program.

2. Stability

When a user is able to input data that the application is not equipped to handle, the application can react in unexpected ways, such as crashing or refusing to save.  Here are a couple of examples:
  • My Zip code begins with a 0.  I have encountered forms where I can’t save my address because the application strips the leading 0 off of the Zip code and then tells me that my Zip code has only four digits.  
  • I have a co-worker who has both a hyphen and an apostrophe in his last name.  He told me that entering his name frequently breaks the forms he is filling out.

3. Visual Consistency

When a field has too many characters in it, it can affect the way a page is displayed.  This can be easily seen when looking at any QA test environment.  For example, if a list of first names and last names is displayed on a page of contacts, you will often see that some astute tester has entered “Reallyreallyreallyreallyreallylongfirstname Reallyreallyreallyreallyreallylonglastname” as one of the contacts.  If a name like this causes the contact page to be excessively wide and need a horizontal scroll bar, then a real user in the production environment could potentially cause the page to render in this way.
4. Health of the Database

When fields are not validated correctly, all kinds of erroneous data can be saved to the database.  This can affect both how the application runs and how it behaves.  

The phone number field is an excellent example of how unhealthy data can affect an application.  I worked for a company where for years phone numbers were not validated properly.  When we were updating the application, we wanted to automatically format phone numbers so they would display attractively in this format:  (800)-555-1000.  But because there were values in the database like “Dad’s number”, there was no way to format them, therefore causing an error on the page.
Painstakingly validating input fields can be very tedious, but the above examples demonstrate why it is so important.  The good news is that there are ways to alleviate the boredom.  Automating validation checks can keep us from having to manually run the same tests repeatedly.  Monkey-testing tools can help flush out bugs.  And adding a sense of whimsy to testing can help keep things interesting.  I have all the lyrics to “Frosty the Snowman” saved in a text file.  Whenever I need to test the allowed length of a text field, I paste all or some of the lyrics into the field.  When a developer sees database entries with “Frosty the Snowman was a j”, they know I have been there!

Easy Free Automation Part VIII: Accessibility Tests

Accessibility in the context of a software application means that as many people as possible can use the application easily.  When making an application accessible, we should consider users with limited vision or hearing, limited cognitive ability, and limited dexterity.  Accessibility also means that users from all over the world can use the application, even if their language is different from that of the developers who created it.

In this final post in my “Easy Free Automation” series, I’ll be showing two easy ways to test for accessibility.  I’ll be using Python and Selenium Webdriver.  You can download the simple test here.

To run the test, you will need to have Python and Selenium installed.  You can find instructions for installing Python in Easy Free Automation Part I: Unit Tests.  To install Selenium, open a command window and type pip install selenium.  You may also need to have Chromedriver installed.  You can find instructions for installing it here.

Once you have downloaded the test file and installed all the needed components, navigate to the test folder in the command line and type python3 easyFreeAccessibilityTest.py.  (If you don’t have Python 3, or if you don’t have two versions of Python installed, you may be able to type python instead of python3.) The test should run, the Chrome browser should open and close when the test is completed, and in the command line you should see these two log entries:
Alt text is present
Page is in German

Let’s take a look at these two tests to see what they do.  The first test verifies that an image has an alt text.  Alt texts are used to provide a description of an image for any user who might not be able to see the image.  A screen-reading application will read the alt text aloud so the user will know what image is portrayed.

driver.get(“https://www.amazon.com/s?k=goodnight+moon&ref=nb_sb_noss_1”)
elem = driver.find_element_by_class_name(“s-image”)
val = elem.get_attribute(‘alt’)
if val == ‘Goodnight Moon’:
print(‘Alt text is present’)
else:
print(‘Alt text is missing or incorrect’)

In the first line, we are navigating to an Amazon.com web page where we are searching for the children’s book “Goodnight Moon”.  In the next line, we are locating the book image.  In the third line, we are getting the ‘alt’ attribute of the web element and assigning it to the variable ‘val’.  If there is no alt text, this variable will remain null.

Finally we are using an if statement to assert that the alt text is correct.  If the alt text is not the title of the book, we will get a message that the text is missing.

The second test verifies that we are able to change the language of the Audi website to German.

driver.get(“https://www.audi.com/en.html”)
driver.find_element_by_link_text(“DE”).click()
try:
elem = driver.find_element_by_link_text(“Kontakt”)
if elem:
print(‘Page is in German’)
except:
print(‘Page is not in German’)

In the first line, we navigate to the Audi website.  In the second line, we find the button that will change the language to German, and we click it.  Then we look for the element with the link text of “Kontakt”.  If we find the element, we can conclude that we are on the German version of the page.  If we do not find the element, the page has not been changed to German.  The reason I am using a try-except block here is that if the element with the link text is not located, an error will be thrown.  I’m catching the error so that an appropriate error message can be logged and the test can end properly.

There are other ways to verify things like alt texts and page translations.  There are CSS scanning tools that will verify the presence of alt texts and rate how well a page can be read by a screen reader.  There are services that will check your internationalization of your site with native speakers of many different languages.  But if you are looking for an easy, free way to check these things, this simple test script provides you with a way to get started.

For the last eight weeks, we’ve looked at easy, free ways to automate each area of the Automation Test Wheel.  I hope you have found these posts informative!  If you missed any of the posts, I hope you’ll go back and take a look.  Remember also that each week has a code sample that can be found at my Github page.  Happy automating!

Easy Free Automation Part VII: Load Tests

Load testing is a key part of checking the health of your application.  Just because you get a timely response when you make an HTTP request in your test environment doesn’t mean that the application will respond appropriately when 100,000 users are making the same request in your production environment.  With load testing, you can simulate different scenarios as you make HTTP calls to determine how your application will behave under real-world conditions.

There are a wide variety of load testing tools available, but many of them require a subscription.  Both paid and free tools can often be confusing to use or difficult to set up.  For load testing that is free, easy to install, and fairly easy to set up, I recommend K6.

As with every installment of this “Easy Free Automation” series, I’ve created an automation script that you can download here.  In order to run the load test script, you’ll need to install K6, which is easy to do with these instructions.

Once you have installed K6 and downloaded your test script, open a command window and navigate to the location where you downloaded the script.  Then type k6 run loadTestScript.js.  The test should run and display a number of metrics as the result.

Let’s take a look at what this script is doing.  I’m making four different requests to the Swagger Pet Store.  (For more information about the Swagger Pet Store, take a look at this blog post and the posts that follow it.)  I’ve kept my requests very simple to make it easier to read the test script: I’m adding a pet with just a pet name, I’m retrieving the pet, I’m updating the pet by changing the name, and I’m deleting the pet.

import http from “k6/http”;
import { check, sleep } from “k6”;

In the first two lines of the script, I’m importing the modules needed for the script: the http module that allows me to make http requests, and the check and sleep modules that allow me to do assertions and put in a wait in between requests. 

export let options = {
  vus: 1,
  duration: “5s”
};

In this section, I’m setting the options for running my load tests.  The word “vus” stands for “virtual users”, and “duration” describes how long in seconds the test should run.

var id = Math.floor(Math.random() * 10000);
console.log(“ID used: “+id);

Here I’m coming up with a random id to use for the pet, which will get passed through one complete test iteration. 

var url = “http://petstore.swagger.io/v2/pet”;
var payload = JSON.stringify({ id: id, name: “Grumpy Cat” });
var params =  { headers: { “Content-Type”: “application/json” } }
let postRes = http.post(url, payload, params);

This is how the POST request is set up.  First I set the URL, then the payload, then the headers; then I do the POST request. 

check(postRes, {
    “post status is 200”: (r) => r.status == 200,
    “post transaction time is OK”: (r) => r.timings.duration < 200
  });
sleep(1);

Once the POST has executed, and the result has been assigned to the postRes variable, I check to make sure that the status returned was 200, and that the transaction time was less than 200 milliseconds.  Finally, I have the script sleep for one second. 

Now let’s take a look at the load test output:

INFO[0005] ID used: 1067

This is the id created for the test, which I set up to be logged in line 12 of the script.  At the beginning of each iteration of the script, a new id will be created and logged. 

✓ put status is 200
✓ put transaction time is OK
✓ delete status is 200
✓ delete transaction time is OK
✓ post status is 200
✓ post transaction time is OK
✓ get status is 200
✓ get transaction time is OK

Here are the results of my assertions.  All the POSTs, GETs, PUTs, and DELETEs were successful.

http_req_duration……….: avg=27.56ms min=23.16ms med=26.68ms max=34.69ms p(90)=31.66ms p(95)=33.18ms  

This section shows metrics about the duration of each request.  The average request duration was 27.56 milliseconds, and the maximum request time was 34.69 milliseconds.

iterations…………….. : 1       0.199987/s
vus…………………… : 1         min=1 max=1
vus_max……………….. : 1    min=1 max=1

This section shows how many complete iterations were run during the test, and what the frequency was; how many virtual users there were; and how many virtual users there were in maximum.

Obviously, this wasn’t much of a load test, because we only used one user and it only ran for five seconds!  Let’s make a change to the script and see how our results change.  First we’ll leave the number of virtual users at 1, but we’ll set the test to run for a full minute.  Change line 6 of the script to duration: “1m”, and run the test again with the k6 run loadTestScript.js command. 

http_req_duration……….: avg=26.13ms min=22.3ms  med=25.86ms max=37.45ms p(90)=27.57ms  p(95)=33.56ms

The results look very similar to our first test, which isn’t surprising, since we are still using just one virtual user. 

iterations……………..: 14      0.233333/s

Because we had a longer test time, we went through several more iterations, at the rate of .23 per second.

Now let’s see what happens when we use 10 virtual users.  Change line 5 of the test to: vus: 10, and run the test again.

✓ delete transaction time is OK
✓ post status is 200
✓ post transaction time is OK
✗ get status is 200
     â†³  83% — ✓ 117 / ✗ 23
✓ get transaction time is OK
✓ put status is 200
✓ put transaction time is OK
✗ delete status is 200
     â†³  77% — ✓ 108 / ✗ 31

We are now seeing the impact of adding load to the test; some of our GET requests and DELETE requests failed.

http_req_duration……….: avg=27.8ms  min=21.17ms med=26.67ms max=63.74ms p(90)=33.08ms p(95)=34.98ms

Note also that our maximum duration was much longer than our duration in the previous two test runs.

This is by no means a complete load test; it’s just an introduction to what can be done with the K6 tool.  It’s possible to set up the test to have realistic ramp-up and ramp-down times, where there’s less load at the beginning and end of the test and more load in the middle.  You can also create your own custom metrics to make it easier to analyze the results of each request type.  If you ever find yourself needing to some quick free load testing, K6 may be the tool for you.

Next week, I’ll close out the “Easy Free Automation” series with a look at accessibility tests!

Easy Free Automation Part VI: Security Tests

Often when people think of security testing, they think of complicated software scans, request intercepts, and IP address spoofing.  But some of the most crucial application security testing can be done simply through making API requests.  In this week’s post, I’m taking a look at examples of authentication testing, authorization testing, and field validation testing.

As I have in every post in this Easy Free Automation series, I’ve created an example that you can download here.  This is a simple json file that can be run with Newman.  As you recall from Easy Free Automation Part III: Services Tests, Newman is the command-line runner for Postman, my favorite API testing tool.  If you need to install Postman or Newman, take a look at that post.

For my test application, I’m using the awesome Restful-Booker API.  It’s worth noting that this API does come with some intentional bugs, two of which I’ll mention below.

The json file I’ve made available on Github is for the test collection.  I didn’t include an environment file this week, because I didn’t need to store any variables.  Once you have downloaded the json file, open a command window, change directories to get to the directory where the file is stored, and type newman run easyFreeSecurityTests.json. You should see sixteen tests run and pass.

Let’s take a look at the kinds of tests we’re running.  The tests will be easier to interpret if you upload them into Postman; take a look at this post if you need help doing that.

The first six tests in the collection are authentication tests.  I am verifying that I can’t log in with invalid credentials.  But I’m verifying six different invalid username and password combinations:

  • Create token with empty username
  • Create token with invalid username
  • Create token with empty password
  • Create token with invalid password
  • Create token with empty username and password
  • Create token with invalid username and password

This may seem like overkill, but I have actually encountered bugs where a user can log in if the password field is blank, and where a user can log in if both the username and password are incorrect. 

The assertion I am using for each of the six authentication tests is the following:
pm.test(“Bad credential message returned”, function () {
    pm.expect(pm.response.text()).to.include(“Bad credentials”);
});

Ordinarily I would assert that the response code I was getting was a 401, but since this request is (incorrectly) returning a 200, I’m instead verifying the text of the response: “Bad credentials”.  (For more information on HTTP error codes, see this post.)

The next six tests in my collection are authorization tests.  There are three actions in the Restful-Booker that require a valid token: Put, Patch, and Delete.  So for each of these requests, I’m testing that I cannot run the request with a missing token, and I cannot run the request with an invalid token:

  • Update booking with no token
  • Update booking with invalid token
  • Partial update booking with no token
  • Partial update booking with invalid token
  • Delete booking with no token
  • Delete booking with invalid token

For each of these requests, I am asserting that I receive a 403 status code as a response:
pm.test(“Status code is 403”, function () {
     pm.response.to.have.status(403);
});
If a developer makes a change to the code and accidentally removes the token requirement for one of these operations, automated tests like these will discover the error right away, because the response code will change to a 200 or a 201.
Finally, I have four field validation tests.  I would like to have more tests here, but because some of the fields in this API aren’t validated, I’m sticking to the date fields.  In each of these tests, I am sending in an invalid date:
  • Create booking invalid checkin month
  • Create booking invalid checkin day
  • Create booking invalid checkout month
  • Create booking invalid checkout day

In each of these tests, I am validating that I receive an invalid date message:

pm.test(“Invalid date response”, function () {
     pm.response.to.have.body(“Invalid date”);
});
Field validation might not seem like a security concern, but it’s one of the easiest ways to hack an application, through entering in a script for XSS or a SQL command for SQL injection.  By verifying that the application’s input fields are only allowing in certain data types or formats and only allowing in a certain number of characters, we are going a long way towards protecting ourselves from these attacks.
Astute readers will have noticed that we could also have date field validation on the PUT requests that update a booking, and the PATCH requests that partially update a booking.  And of course, if the other fields such as First Name and Last Name had validation (as they should), we would want to test that validation as well.
Running simple repetitive tests like this is not particularly glamorous and will never make headlines.  But it’s simple tests like these that can catch a security problem way before it becomes an issue.  Just recently I was alerted that some tests I had set up to run nightly in a QA environment were failing.  Upon investigation, I discovered that my test user was now able to access information belonging to another user.  If I hadn’t had authorization tests in place, that security hole might have been missed and might have made it to production.  
Next week, we’ll move on to Easy Free Load Tests!

Easy Free Automation Part V: Visual Tests

Visual tests are more than just UI tests; they verify that what you are expecting to see in a browser window is actually rendered.  Traditional UI tests might verify that a page element exists or that it can be clicked on, but they don’t validate what the element looks like.  Fortunately, there are a variety of ways to do visual validation.  My favorite way is through Applitools, but since this series of posts is on “Easy Free Automation”, I needed to look elsewhere for visual validation this week.

I settled on a fun tool called BackstopJS.  It was pretty easy to set up, and while I haven’t yet discovered everything that it can do, I created a simple example with two tests that you can clone or download here.

Once you have cloned or downloaded these files, it’s time to install BackstopJS.  I’m assuming that you already have Node and npm installed; if you don’t, see last week’s post for instructions.  To install BackstopJS, simply open your command window and type npm install -g backstop.js.  

After the installation completes, navigate using the command line to the folder where you have downloaded the easyFreeVisualTests files, and type backstop test.  This will run the visual tests for the first time, and when the tests complete, a browser window will pop up with the test results.  You’ll notice that the tests all failed; this is expected, and we’ll fix this in a moment.  Before we do, take a look at the test results.  You should see four tests: two tests with screenshots of Google’s homepage, and two tests with screenshots of my picture (taken from my personal website).  The tests failed because at the moment, there is nothing to compare the screenshots to.  We can accept the screenshots and use them for future comparisons by typing backstop approve in the command line.  Now run backstop test again, and you will see the four tests run and pass.

Let’s take a look at the backstop.json file to see how these tests are configured.  Near the top of the file, we see the viewports section:

This section is showing what screen sizes we want to test with.  In this case, we are testing with a phone screen size and a laptop browser size.

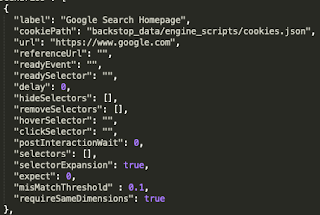
A little farther down, we see the scenarios section.  The first scenario is for the Google Search Homepage:

We see the label of the test, along with the url.  Also of note is the “misMatchThreshold”.  Setting this to a higher number means that the test will allow for a higher percentage of pixel mismatches before failing the test.

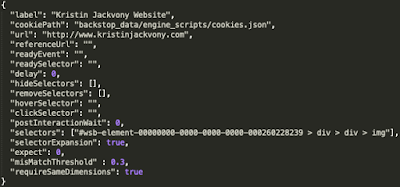
The second scenario is for my personal webpage:

Note that this scenario is using the “selectors” section.  In this section, I’m specifying the specific element I want to look at: my picture.  When the test runs, rather than taking a screenshot of the entire page, it takes a screenshot of this single element and compares it to the baseline screenshot.  This is great for pages that have content that changes frequently; you can set your test to look only at the elements that stay the same.

If you want to add BackstopJS to your own Javascript project, it’s easy to do!  Simply navigate to your project folder in the command line and run backstop init. This will add a backstop.js file to your existing project, and you can configure it as needed.

It would certainly be possible to have both Backstop and other UI automated tests installed in the same project.  When your automation runs, you could run through all of your UI tests first, then run your Backstop tests to verify all your visual elements are appearing as expected.

Next week, we’ll move on to automated security tests!

Easy Free Automation Part IV: UI Tests

I’ll be honest: UI tests are my least favorite automated tests.  This is because they are often so hard to set up.  There are dozens of different ways to run automated UI tests, but this can make things more confusing because it’s hard for someone new to automation to figure out what to do.

So when I prepared to write this week’s post, my primary goal was to make it as easy as possible to get started with UI testing.  And of course, I also wanted the framework to be free, with no need to purchase a tool.

I’ve arrived at a way to get up and running with UI automation using Node and Selenium Webdriver in just six steps.  While I have only tested this process on two computers, I believe these steps will be effective for most people.  The one prerequisite is that you need to have Chrome installed, because that’s the browser that we will be using for the test.

Setting Up Automated UI Testing in Six Easy Steps:

1. Open up a command window and verify that you have Node.js installed by typing
node –version
If you get a version number in response, you have Node installed.  If it’s not installed, you can install it here: https://nodejs.org/en/.

2. If you needed to install Node in Step 1, add Node to your system’s PATH (see instructions for Windows here and instruction for Mac here).  After you’ve done this, reboot your computer so the new PATH will be recognized.  Check one more time that Node is installed by typing
node –version again.

3. When you install Node, the npm package manager should be installed automatically.  Verify that npm is installed by typing
npm –version
If you get a version number in response, npm has been installed.  If not, you can check this link for instructions about installing npm.

4. Open a browser and go to this GitHub repo.   If you have Git installed, you can clone the project.  If not, you can download a zipfile of the project and extract it.

5. In the command window, navigate to the folder where the project has been installed.  The project folder should contain a test.js file and a package.json file.  (See instructions here about navigating in the command line.)  Type this command:
npm install
This will install everything you need to run the automated test.

6. Type this command:
node test
This will run the test.js file, which has one test.  You should see an instance of Chrome browser open, run the test, and close again!

Let’s take a look at what the test.js file does:

var webdriver = require(‘selenium-webdriver’),
    By = webdriver.By,
    until = webdriver.until;
var chrome = require(‘selenium-webdriver/chrome’);
var path = require(‘chromedriver’).path;

var service = new chrome.ServiceBuilder(path).build();
chrome.setDefaultService(service);

var driver = new webdriver.Builder()
    .withCapabilities(webdriver.Capabilities.chrome())
    .build(); 

The purpose of all of this code is to require webdriver and chrome driver, setting up the Chrome driver, and to set up the “By” and “until” classes, which are helpful for automated UI testing.

driver.get(‘http://www.google.com’);

This command tells the driver to navigate to the Google home page.

driver.findElement(By.name(‘q’)).sendKeys(‘webdrivern’);

This command tells the driver to find the web element named “q”, which is the search box; type “webdriver” into the search box; and click the Return key.

driver.findElement(By.partialLinkText(“seleniumhq”)).click();

This command looks through the search responses for the element that has “seleniumhq” in the link text, and once the element has been found, it clicks on it.

driver.wait(until.elementLocated(By.id(‘sidebar’)));

This is waiting for the Selenium Webdriver page to load by watching for the element with the id called ‘sidebar’.

driver.getTitle().then(function(title) {
    if(title === ‘Selenium WebDriver’) {
      console.log(‘Test passed’);
    } else {
      console.log(‘Test failed’);
    }
    driver.quit();
});

Once the element has been located, then the driver looks at the title of the page and checks to see if it is what was expected.  If the title matches “Selenium Webdriver”, it logs to the console that the test passed, and if it does not match, it logs to the console that the test failed.  Finally, the driver closes the browser window.

Hopefully this post has helped you with the most difficult part of automated UI testing- the setup!  Once you are up and running, there are lots of great tutorials that describe how to locate and interact with browser elements using Webdriver.  You can find the documentation for the Webdriver By class here, and I have some old blog posts about element locators here, here, and here.   The posts were written for Java, but the same concepts apply when you are locating elements in Node.

The most important thing to remember about automated UI testing is that it should be done sparingly!  Whatever you can test with unit and services tests should be tested that way instead.  UI testing is best for validating that elements are on a web page, and for running through simple user workflows.  Next week, we’ll go on to an important addition to UI testing: visual testing.

UPDATE: If you are experiencing an issue where you get an “unhandled promise rejection”, try running this command:  npm install selenium-webdriver@3.6.0 and then try running the test again.

Easy Free Automation Part III: Services Tests

This week we are looking at my favorite type of automated tests: services tests.  The reason I love services tests is because they test so much of the application without the hassle of the UI.  There are many types of services, but the most widely used service is the REST API.  And my favorite way to test a REST API is with Postman

I’m not going to get into too many details about REST verbs or about Postman, because I have already done so in earlier blog posts.  If you’d like to catch up on what I’ve written, you can start with this post and work your way forward week by week.  You can also read this tutorial that I wrote for Simple Programmer.  
This post will focus on how you can automate Services Tests.  To demonstrate, I’ve created a collection of Postman tests that you can download from Github here.  The API I’m testing is called Restful-Booker: it’s a great easy API created by Mark Winteringham to help people learn how to test APIs.  
Once you have downloaded the two files from Github, you can upload them in Postman to see what they do.  To upload the collection, click on the Import button on the top left of the Postman window:
When the Import window pops up, click the Choose Files button and then navigate to the location of the file you downloaded called restfulbooker.collection.json.  Click on that file name, and the collection will be imported:  
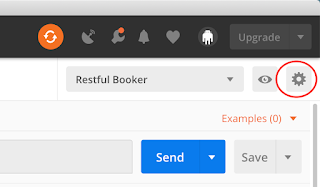
Next, you’ll need to upload the environment file.  The environment file is what contains the variables that are used in the requests and assertions.  To upload the environment file, click on the gear icon in the top right of the Postman window:
When the environment window pops up, click on the Import button, then on the Choose Files button, then navigate to the location of the downloaded file called restfulbooker.env.json.  Click on that file name and the environment will be imported: 
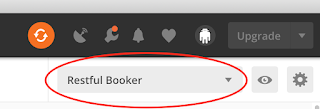
Finally, in the dropdown menu in the top right, select the Restful Booker environment: 
You are now ready to run the requests from within Postman.  Keep in mind that the tests are not idempotent: some of the requests depend on previous requests for setting variables and creating bookings, so while you are exploring you should run the requests in order.
Let’s take a look at one of the requests and its assertions:
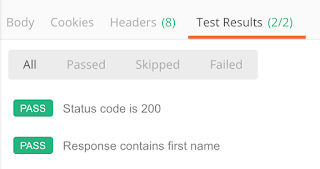
This is a GET request.  The URL of the request is https://restful-booker.herokuapp.com/booking/1.  The request is asking for the booking with the id of 1.  You can see two tests in the Tests section: the first test verifies that the response code of the request is 200, and the second test verifies that “firstname” is one of the fields in the response.  
Click the Send button to run the request, then scroll down to the bottom of the page:
Here you see the body of the response, which has returned a booking.  You can also see a tab called Test Results, which shows that 2 out of 2 tests pass.  If you click on this tab, you can see your results:
Now that you understand how the tests and assertions work, let’s run them from the command line!  In order to do this, you will need to have node.js installed.  Installing node will also install npm, which is the node package manager.  Then you can use npm to install Newman, the package that is used to run Postman tests.  To install Newman, simply open your command-line window and type: 
npm install -g newman

Once Newman is installed, navigate in the command-line window to the place where your restfulbooker.collection.json and restfulbooker.environment.json files are located.  Now you can run your tests with this command::

newman run restfulbooker.collection.json -e restfulbooker.environment.json

(This command should be in a line with no returns; it’s OK if it wraps around to a second line, though.)

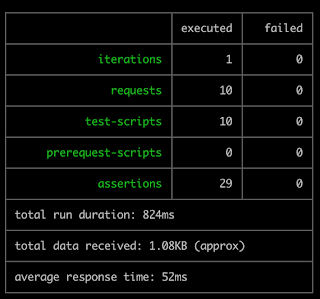
The “-e” in this command stands for “environment”.  If all goes well, you should get a result that looks like this:  
You can also run your tests from other file locations.  To do this, simply specify the path to your files in your command.  For example, if my files were in a folder called NightlyTests, which was in my Documents folder, and if I were using a Windows computer, I would use this command:
newman run C:UsersKJackvonyDocumentsNightlyTestsrestfulbooker.collection.json -e C:UsersKJackvonyDocumentsNightlyTestsrestfulbooker.environment.json

Now that you know how to run your tests from the command line, you can set up your tests to run automatically with a cron job or in a CI/CD platform such as Jenkins.  Just be aware that whatever machine you run your tests on will need to have Newman installed.  

You can also have your test results write to a file with the -r command.  For example, you can have your results written in junit with this command:

newman run restfulbooker.collection.json -e restfulbooker.environment.json -r junit

When the tests are finished running, a Newman folder will be created with your test results inside.

I hope that this tutorial has given you some ideas about how you can automate your API testing!  Next week we’ll move on to UI tests with Selenium.  

Easy Free Automation Part II: Component Tests

Last week, I started an eight-part series to demonstrate in a free and very easy way how to write automation for each test type in the Automation Test Wheel.  This week, we’re taking a look at component tests.

As with every term in software testing, component tests mean different things to different people.  I like to define a component test as a test for a service that an application is dependent on.  For example, an application might need to make calls to a database, so I would have a component test that made a simple call to that database and verified that it received data in response.  Another example of a component would be an API that the application doesn’t own.  In this scenario, I would make a simple call to the API and verify that I got a 200-level response.

Coming up with a free and easy example of automated component tests was, unfortunately, not that easy!  But I have created a very simple Node.js application, which you can download from Github here.

In order to run this application and have my two tests pass, you’ll need to have Node, npm, and MongoDB installed, and you’ll need to create a very simple Mongo database with just one item in it.  I used most of the instructions in this really awesome tutorial by Chris Buecheler at CloseBrace.com to create this application.  You can use my application along with the instructions in Part 3 of the tutorial to make your Mongo database.  Or you can just clone my application and run it, with the understanding that one of the tests will fail. Or if this seems like too much work, you can just read on and look at my test code!

My extremely simple app is dependent on two things: my Mongo database, and an external API (the really great Restful-Booker API, which I’ll be using in next week’s blog).  For my component tests, I want to test those two dependencies: that I can make a request to the database and get a positive response, and that I can make a call to the Restful-Booker API and get a positive response. 

I am using Jest and Supertest for these tests.  I have limited experience with Jest, but from what I have seen so far, it is very easy to set up.  Supertest is a library that enhances Javascript testing by making it easier to call APIs. 

I’ve put my tests in a file called index.test.js, and this is what it looks like:

const request = require(‘supertest’);

describe(‘Database Connection Test’, () => {
  it(‘Returns a 200 with a call to the DB’, async () => {
    const res = await request(‘http://localhost:3000’)
      .get(‘/userlist’)
      .expect(200)
  });
});

describe(‘Restful-Booker Connection Test’, () => {
  it(‘Returns a 201 with a health check’, async () => {
    const res = await request(‘https://restful-  booker.herokuapp.com’)
      .get(‘/ping’)
      .expect(201)
  });
});

The first line of my file is invoking Supertest, so I will be able to do HTTP requests.  Let’s take a look at each part of the first test so we can see what it’s doing:

describe(‘Database Connection Test’, () => {
  it(‘Returns a 200 with a call to the DB’, async () => {
    const res = await request(‘http://localhost:3000’)
      .get(‘/userlist’)
      .expect(200)
  });
});

The “describe” section comprises the entire test. 

describe(‘Database Connection Test’, () => {
  it(‘Returns a 200 with a call to the DB’, async () => {
    const res = await request(‘http://localhost:3000’)
      .get(‘/userlist’)
      .expect(200)
  });
});

‘Database Connection Test’ is the title of the test.

describe(‘Database Connection Test’, () => {
  it(‘Returns a 200 with a call to the DB’, async () => {
    const res = await request(‘http://localhost:3000’)
      .get(‘/userlist’)
      .expect(200)
  });
});

The “it” section is where the assertion is called.

describe(‘Database Connection Test’, () => {
  it(‘Returns a 200 with a call to the DB’, async () => {
    const res = await request(‘http://localhost:3000’)
      .get(‘/userlist’)
      .expect(200)
  });
});

‘Returns a 200 with a call to the DB’ is the title of the assertion.

describe(‘Database Connection Test’, () => {
  it(‘Returns a 200 with a call to the DB’, async () => {
    const res = await request(‘http://localhost:3000’)
      .get(‘/userlist’)
      .expect(200)
  });
});

Here is where we are making a GET request to ‘http://localhost:/3000/userlist’.

describe(‘Database Connection Test’, () => {
  it(‘Returns a 200 with a call to the DB’, async () => {
    const res = await request(‘http://localhost:3000’)
      .get(‘/userlist’)
      .expect(200)
  });
});

Here is where we are expecting that we will get a 200 response.

If you’d like to try to run the tests on your own, assuming you have cloned the application, you can do so with these commands:

cd easyFreeComponentTests (this will move you to the directory where you cloned the application)
npm install (this will install all the components you need to run the application)
npm start (this will start the application)

Then go to a new command-line window, cd to where the application is located, and run:

npm test (this will run the tests)

That was a lot of information for just two component tests!  But remember it will be easier to get started when there is already a project to test.  How many tests you have in this area will depend on how many external systems your application is dependent on.  It may be a good idea to create a “health check” that will run your component tests whenever your code is deployed.  That way you will be alerted if there is any error when calling your external systems. 

Next week, we’ll move on to my favorite test type: services tests!

Easy Free Automation Part I: Unit Tests

This post is the beginning of an eight-part series on easy, free ways to automate each area of the Automation Test Wheel.  It’s been my experience that there are a number of barriers to learning test automation.  First, the team you are on might not need certain types of automation.  For example, my team has been solely API-focused, so for the last two years I haven’t had much reason to do UI automation.  Second, your company may already have invested in specific automation tools, so when you want to learn to use a different tool, you need to do it on your own.  Third, there are many tools that have barriers to using them, such as a high cost or a complicated setup.  And finally, there is not always good documentation out there to help people get started.

In this series, I’m hoping to provide simple, free examples that will demonstrate each area of the Automation Test Wheel in practice, which you can use as a jumping-off point in your own automation journey.  We’ll begin with unit tests.

Unit tests are usually written by developers, but it’s a good idea for all software testers to understand what they are and how they work.  Unit tests test just one method or function, and they aim to exercise as many paths of that method or function as possible.  The major benefit of unit tests is that they provide extremely fast, accurate feedback.
I’m going to use Python and Pytest to demonstrate how unit tests work.  I am admittedly not an expert in either, but I managed to put together a little project with just one function.  If you would like to try the code out yourself, I have added it to GitHub here.  (If you have never cloned a Git repository before, you can find some instructions here.)
To run the tests, you will need to have Python installed.  There are some great directions for installing Python here.  Installing Python 3 will most likely install pip, the Python package installer, but if it doesn’t, you can get installation instructions here.  Finally, you’ll need to use pip to install Pytest; there are instructions for that here.  (If all this seems like too much work, you can just read on and look at the examples.)
In the file called _init_.py, I’ve written a simple function called isItADozen that determines whether a number of objects equals a dozen.  Here’s the code:
def isItADozen(input): 
if type(input) != int:
result = “This is not a number”
elif input == 12:
result = “Yup, it’s a dozen!”
elif input < 12 and input > 0:
result = “Nope, you have less than a dozen”
elif input > 12:
result = “You have more than a dozen here”
elif input <=0:
result = “You don’t have any at all!”
return result

The function takes the input and first checks to see if it’s an integer.  If not, it returns the message “This is not a number”.  Then it checks to see whether the number is 12, or is more than 12, or is between 0 and 12, or is less than 0.  Depending on which statement is true, it will return an appropriate message.  
Before we look at the unit tests, let’s think about how we would test this function manually, assuming it had a UI interface.  We’d check to make sure it recognized 12 as a dozen, we’d check to make sure it recognized when a number was more than or less than a dozen, and we’d also try some of the usual QA tricks, like passing in a negative number or “FOO”.  
That’s exactly what we’ll do with our unit tests!  Here is the code in my test.py file:
import unittest

from my_test import isItADozen

class TestDozen(unittest.TestCase):
    def test_a_dozen(self):
        result = isItADozen(12)
        self.assertEqual(result, “Yup, it’s a dozen!”)

    def test_more_than_a_dozen(self):
    result = isItADozen(15)
    self.assertEqual(result, “You have more than a dozen here”)

    def test_less_than_a_dozen(self):
    result = isItADozen(10)
    self.assertEqual(result, “Nope, you have less than a dozen”)

    def test_less_than_zero(self):
    result = isItADozen(-1)
    self.assertEqual(result, “You don’t have any at all!”)

    def test_not_a_number(self):
    result = isItADozen(“FOO”)
    self.assertEqual(result, “This is not a number”)

if __name__ == ‘__main__’:
    unittest.main()

I have five test cases here, aptly named:
test_a_dozen
test_more_than_a_dozen
test_less_than_a_dozen
test_less_than_zero
test_not_a_number

In each test, I call the isItADozen function with the number I want to test with.  Then I assert that the result I got matches the result I was expecting.  

To run my tests, I simply go to the command line, navigate to the unitTestProject folder, and type:

python3 test.py –verbose

(If you don’t know how to use your command line, see my blog post from several years ago.)

You may not need to use the “3” in “python3”- I need to do this because I have Python 2.7.1 installed as well and I want to run on the newer version.  You don’t need to do the “–verbose” command; I like to do this because then it shows me the names of my tests as they pass instead of “…..”, which isn’t much fun.  
Once you have the tests running, try making one fail by changing one of the assert statements like this:
self.assertEqual(result, “This is not the real result message”)
Then see if you can change a test so that you are passing in a different value.  For example, you could pass the number 13 into the “test_more_than_a_dozen” test instead of 15.  
Once you have mastered that, you may want to copy my entire test folder and see if you can write your own simple function and unit tests.  If you are more familiar with another programming language, you can try writing unit tests in that language as well.  
Hopefully this has been an easy way to get you started with writing unit tests!  We’ll continue with the Easy Free Automation series next week.