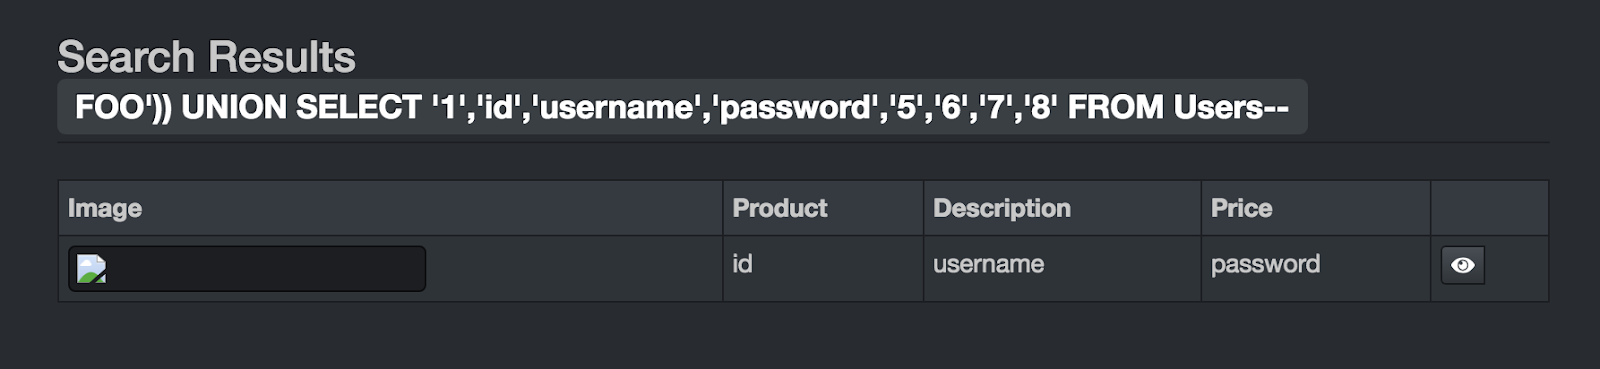
We all know that Session Hijacking is bad, and that we should protect ourselves and our applications against it. But it’s difficult to get easy-to-understand information about what it is, and how to test for it. In this post, I’ll first describe the different types of session hijacking, and then I’ll provide a walkthrough on how to test for session hijacking using the OWASP Juice Shop and Burp Suite.
Session Hijacking refers to when a malicious user gets access to authentication information, and uses it to impersonate another user or gain access to information they should not have. There are several types of Session Hijacking:
Predictable Session Token- this happens when the access tokens being generated by an application follow some kind of pattern. For example, if a token granted for a login for a user was “APP123”, and a token granted for a second user was “APP124”, a malicious user could assume that the next token granted would be “APP125”. This is a pretty obvious vulnerability, and there are many tools in use today that create non-sequential tokens, so it’s not a very common attack.
Session Sniffing- this takes place when a malicious user finds a way to examine the web traffic that is being sent between a user and a web server, and copies the token for their own use. This is classified as a passive attack, because the malicious user is not interfering with the operation of the application or with the request.
Client-Side Attack- in this scenario, the malicious user is using XSS to cause an application to display a user’s token. Then they copy the token and use it.
Man-in-the-Middle Attack- this attack is similar to Session Sniffing in that the malicious user gains access to web traffic. But this is an active attack, because the malicious user uses a tool such as Burp Suite or Fiddler to intercept the request and then manipulate it for their purposes.
Man-in-the-Browser Attack- this takes place when a malicious user has managed to get code into another user’s computer. The implanted code will then send all request information to the malicious user.
Now we are going to learn how test for Session Hijacking by using a Man-in-the-Middle Attack! But first, it’s important to note that we are going to be intercepting requests by using the same computer where we are making the requests. In a real Man-in-the-Middle Attack, the malicious user would be using some sort of packet-sniffing tool to gain access to requests that someone was making on a different computer.
The instructions provided here will be for Firefox. Since I generally do my browsing (and blog-writing) on Chrome, I like to use a different browser for intercepting requests. But Burp Suite will work with Chrome and Internet Explorer as well.
First, we’ll need to download and install Burp Suite. You can install the free version, which is the Community Edition. Don’t launch it yet.
Next, we’ll set up proxy settings in Firefox. Click on the hamburger menu (a button with three horizontal lines) in the top right corner of the browser. Choose “Preferences” and then scroll down to the bottom of the page and click on the “Settings” button. Select the “Manual Proxy Configuration” radio button, and in the HTTP Proxy field, type “127.0.0.1”. In the Port field, type “8080”. Click the checkbox that says “Use this proxy server for all protocols”. If there is anything in the “No proxy for” window, delete it. Then click “OK”.
Now it’s time to start Burp Suite. Start the application, then click “Next”, then click “Start Burp”.
Next we’ll set up the certificate that will give Firefox the permission to allow requests to be intercepted. In Firefox, navigate to http://burp. You’ll see a page appear that says “Burp Suite Community Edition”. Click on the link in the upper right that says “CA Certificate”. A popup window will appear; choose “Save File”. The certificate will download, probably into your Downloads folder.
Click on the hamburger menu again, and choose “Preferences”. In the menu on the left, choose “Privacy and Security”. Scroll to the bottom of the page, and click the “View Certificates” button. A popup window with a list of certificates will appear. Click on the “Import” button, navigate to the “Downloads” folder, choose the recently downloaded certificate, and click the “Open” button. A popup window will appear; check the “Trust this CA to identify websites” checkbox, and then click “OK”. The certificate should now be installed. Restart Firefox to ensure that the new settings are picked up.
Next, return to Burp Suite and turn the intercept function off. We’re doing this so that we’re not intercepting web requests until we’re ready. To turn off the intercept function, click on the Proxy tab in the top row of tabs, then click on the Intercept tab in the second row of tabs, then click on the “Intercept is on” button. The button should now read “Intercept is off”.
Navigate to the Juice Shop, and create an account. Once your account has been created, you’ll be prompted to log in. Before you do so, go back to Burp Suite and turn the intercept function back on, using that “Intercept is off” button.
Now that Burp Suite is set to intercept your requests, log into the Juice Shop. You will see nothing happen initially in your browser; this is because your request has gone to Burp Suite. In Burp Suite, click on the Forward button; this will forward the intercepted request on to the server. Continue to click the Forward button until the Search page of the Juice Shop has loaded completely.
In Burp Suite, click the HTTP History tab, in the second row of tabs. You will see all the HTTP requests that were made when the Search page was loaded. Scroll down until you see a POST request with the /rest/user/login endpoint. Click on this request. In the lower panel of Burp Suite, you will see the details of your request. Notice that your username and password are displayed in clear text! This means that if anyone were to intercept your login request, they would obtain your login credentials, and would then be able to log in as you at any time.
Next, return to the Juice Shop, and click on the cart symbol for the first juice listed in order to add the juice to your shopping cart. Return to Burp Suite and click on the Intercept tab, and then click the Forward button to forward the request. Continue to click the Forward button until no more requests are intercepted.
Return to the HTTP History tab in Burp Suite, and scroll down through the list of requests until you see a POST request with the api/BasketItems endpoint. Right-click on this request and choose “Send to Repeater”. This will send the request to the Repeater module where we can manipulate the request and send it again. Return to the Intercept tab and turn the Intercept off.
Click on the Repeater tab, which is in the top row of tabs. The request we intercepted when we added a juice to the shopping cart is there. Let’s try sending the request again, by clicking on the Go button. In the right panel of the page, we get a 400 response, with the message that the Product Id must be unique. So, let’s return to the request in the left panel. We can see that the body of the request is {“ProductId”:1,”BasketId”:”16″ (this number will vary by your basket id),”quantity”:1}. Let’s change the ProductId from 1 to 2, and send the request again by clicking the Go button. We can see in the response section that the request was successful.
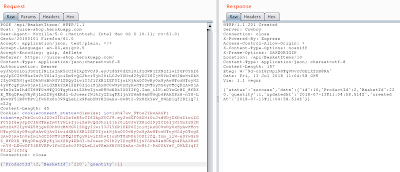
Let’s return to the Juice Shop and see if we were really able to add an item to the cart by sending the request in Burp Suite. Click on the Your Basket link. You should see two juices in your cart. This means that if someone were to intercept your request to add an item to your cart, they could manipulate the request and use it to add any other item they wanted to your cart.
How else might we manipulate this request? Return to the Repeater tab in Burp Suite. The request we intercepted is still there. This time, let’s change the BasketId to a different number, such as 1. Click Go to send the request again. The response was successful, which means that we have just added a juice to someone else’s cart!
So, we can see that if a malicious user would be able to intercept a request to add an item to a shopping cart, they might be able to manipulate that request in all kinds of ways, to add unwanted items to the carts of any number of users. They are able to do this because the request they intercepted has the Authorization needed to make more successful requests. When you set up Burp Suite to intercept requests in your own application, you will be able to test for Session Hijacking vulnerabilities like this one.
This concludes my series of posts on Security Testing, although I will probably write new ones at some point in the future. In the next few weeks, we’ll take a look at browser testing, mobile testing, and visual validation!